The site describes the features of the IMS Admin TOOL and guides the user to the most principal functions.
Introduction
Admintool provides a user interface for managing the IMS configuration, users, and roles. The tool is designed to be used by administrators.
Start of the IMS tool
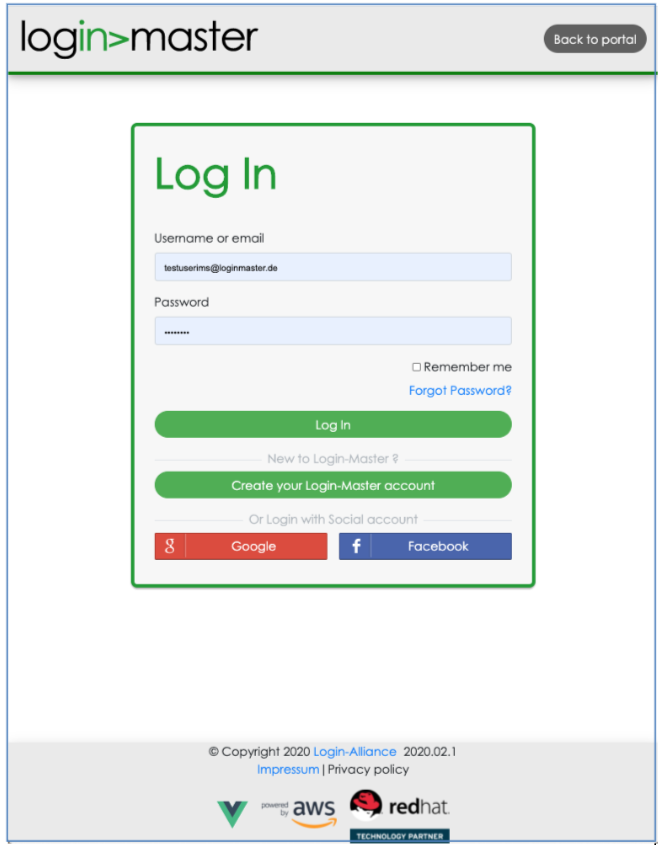
To start the IMS tool, you need to direct your browser to the URL https://ims. <your-domain> (e.g., https://ims.loginmaster.com). If you are not logged in, first you need to authenticate with Login-Master. For authentication, you must provide your username or email address, and password.
After the authentication, the browser will show the initial page of the tool The items on the left side may change depending on your security class and roles.
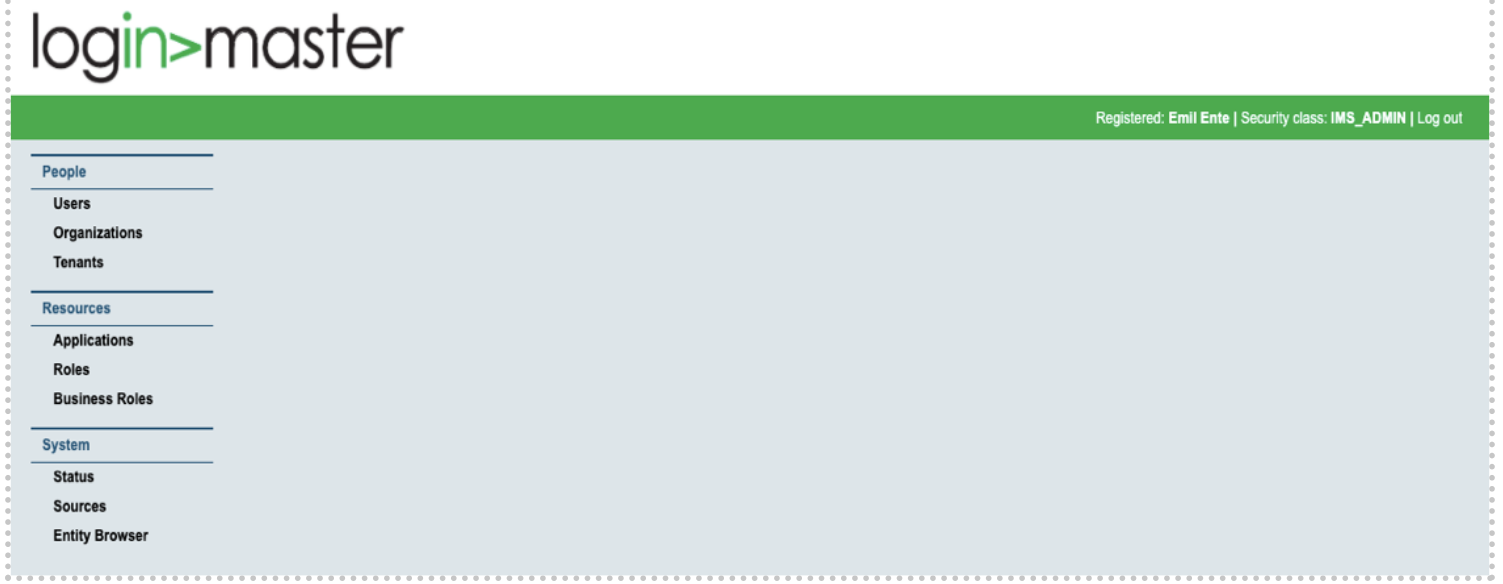
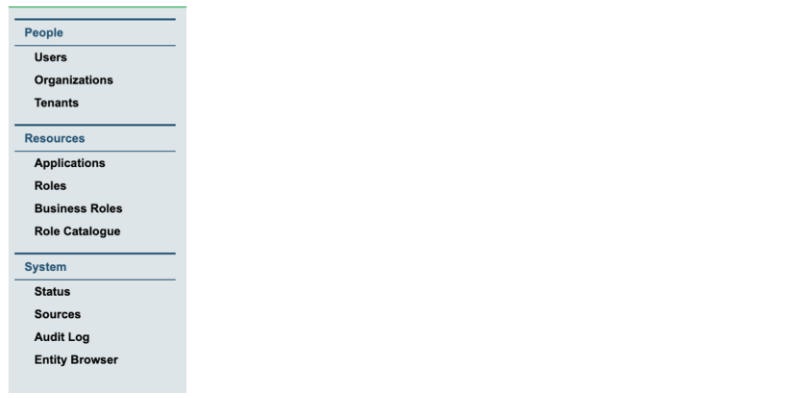
On the left side there is the list of objects that you can manage with the tool: separated into three main areas:
People
-
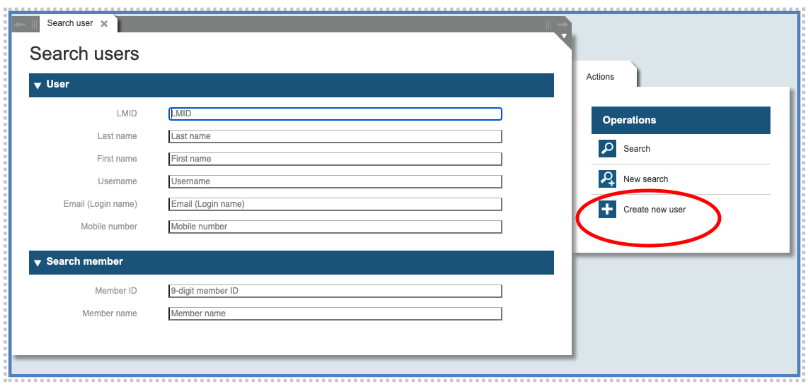
Users This is the most used function of the IMS Tool: it allows the administrator to access all the details of the users and to manage them. Using this function, the administrator can search for a user, select the user from a list, manage personal information, reset the password, or assign an application role.
-
Organizations Login-Master organizes the users in a hierarchical fashion: we may define one or more Corporations, below a Corporation we can have different Companies and in turn an undefined number of Organizational Units. They form the base of delegated administration. Other hierarchical structures are feasible but must be requested and customized.
-
Tenants A Tenant in Login-Master is an application connected to the Single-Sign-On. The terms dates to the first standardization of the OAuth protocol.
Resources
A very important aspect of the user lifecycle (ULC) is the complete process around the Applications and their Roles.
In this area you can define and manage Applications, their Roles, and the Business Roles.
-
Applications All applications connected to Login-Master must be defined here. This allows the definition of the list of roles defined for the application.
-
Roles This function allows us to define and manage the roles of Login-Master and to associate them to applications.
-
Business Roles Allows the definition of several roles to be granted in one step to a user. Additionally, you may automate the granting process based on one or more user’s attribute values (ABAC - Attribute Based Access Control).
System
The area allows access to two important system functions:
-
Status Displays among other status information, the total number of users stored in the system.
-
Sources This function allows the definition and the management of authoritative sources of information. All automatic processes that deliver information for the ULC need to be defined here.
-
Entity Browser This function is for technical administrators and allows a peek into the user registry.
Finally, “Log out” allows the logout from the IMS application.
General information about the IMS tool
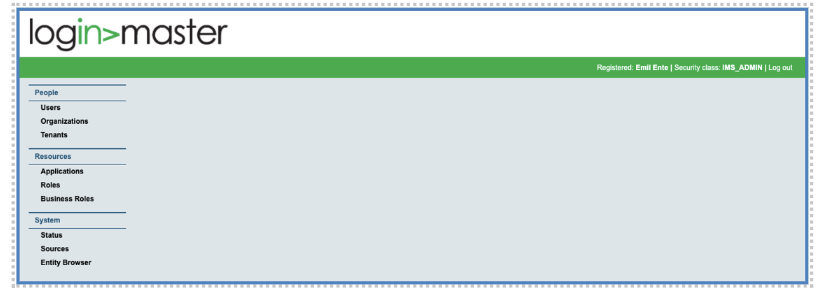
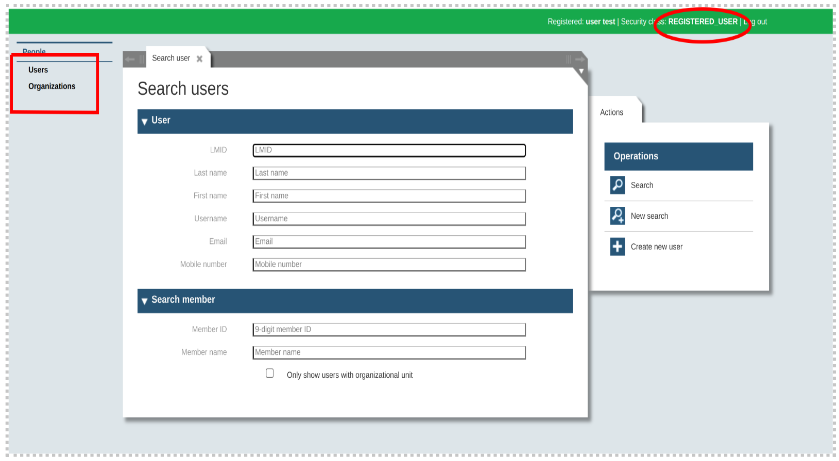
After the start: The IMS tool shows in the left column a list of functions that may be called. The number of functions can vary according to the users and their associate roles. Users will get all functions if the user has the role super admin with the tag role IMS-ADMIN. Only user IMS_ADMIN has this privilege to get ‘super admin’ role.
Moreover, users have different tag roles - REGISTERED_USER, IMS_ADMIN, ORG_ADMIN, COMPANY_ADMIN and CORPORATE_ADMIN. Whatever the tag role is, if user has no assigned role, then after login into the LM-portal with this user, user will not see any functions in the left list.
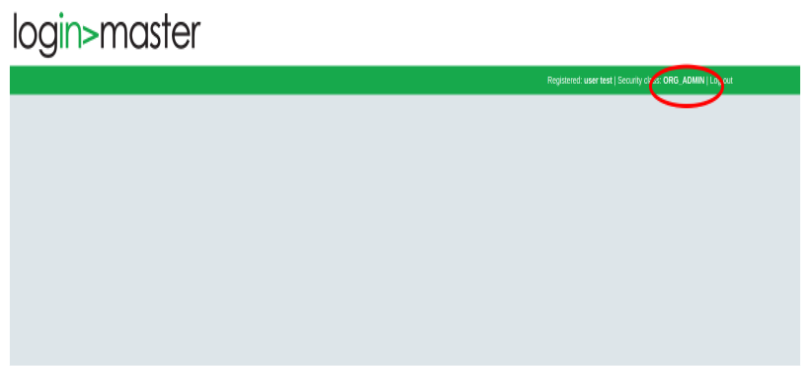

For example: In the above pictures, the user is not getting a single function as user has no assigned role in terms of being an IMS_ADMIN user.
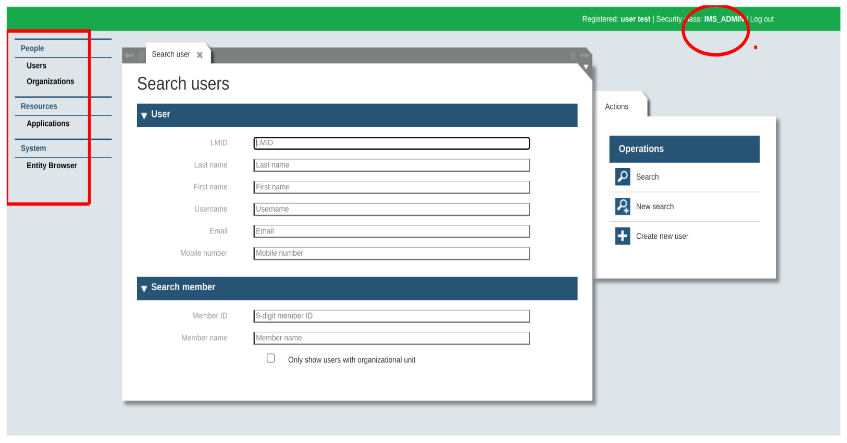
However, by adding separate roles like IMS user administration, Application administration, Entity browser, Catalogue manager and so on, users can access different functionalities. Only IMS_ADMIN users are authorized to access the ‘Super admin’ role. Similarly, all roles are not accessible by every user. Below two images are giving the clear picture:
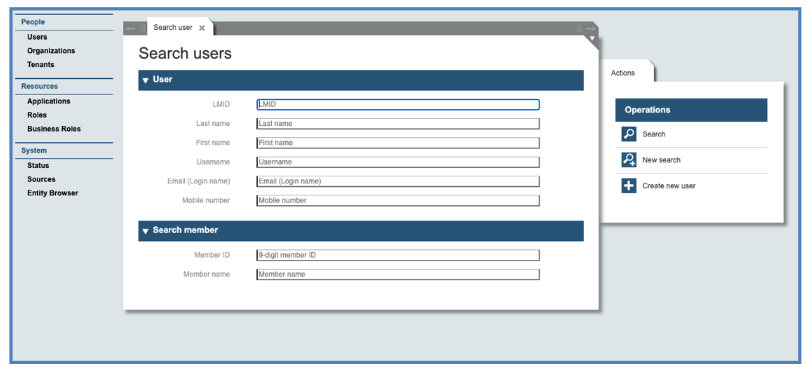
If you click on the left side on users, a mask with search criteria for users will be displayed in the center of the page, while on the right side the possible operations are listed:
As you activate further functions, new tabs will be added at the top of the dialog, allowing you to jump back and forth among the different functions without losing the status of an open operation. So, you may try to define a new user and have just to consult the list of the defined organizational units:
Users
The function “Users” allows you to manage or to create a new user object.
Create a new User
Usually, a user registers through the registration dialogue but there are cases when the administrator must create a user object himself. In this chapter we will describe this process.
After you call the function “Users” from the main Panel, the system shows the dialog “Search Users”. This gives you the option to search for an existing user or to create a new one.
To create a new user object, you need to click the “Create a new user” button in the right list of actions. A form to fill out will then open:
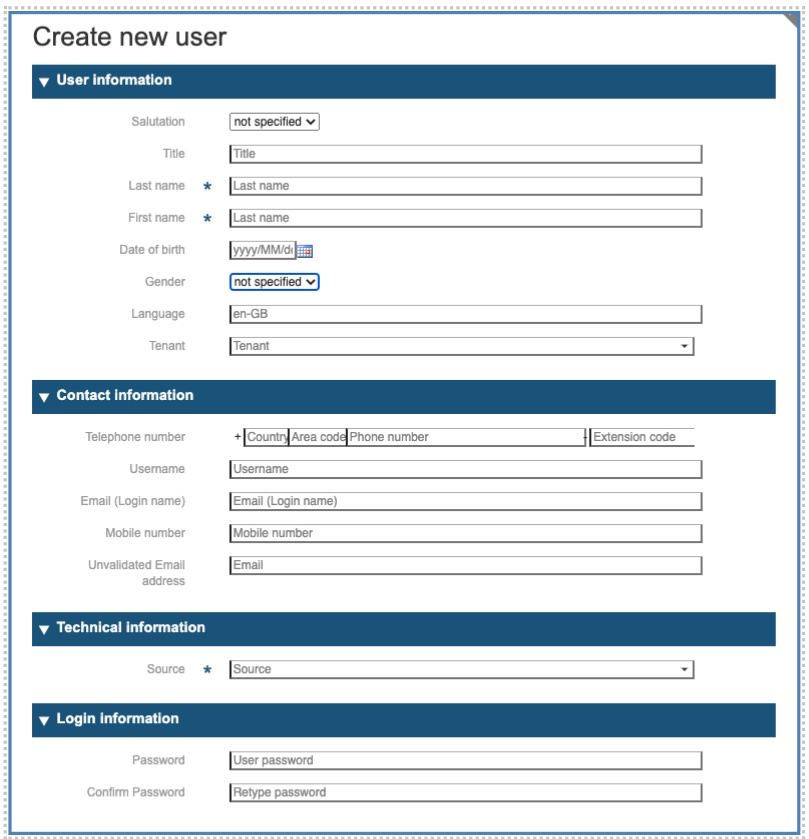
On the resulting empty panel, fill the fields [fields with * are mandatory. The number and type of fields may vary depending of the customizations. The full list must appear in the security policy that the user accepts.]:
First Section: Personal Data
-
Salutation: selection of Mr./Mrs.
-
Title: free text
-
Last Name*: the family name of the user
-
First Name*: given name of the user; to properly address the user in the correspondence
-
Date of Birth: the birthdate of the Person for which the User Object is being created. This may be useful to uniquely identify the user.
-
Gender: the gender of the user, selection of male/female/other
-
Language: preferred language
-
Tenant: Tenant for which the user is being created.
Additional note : Salutation, Title, First and Last Name, Gender and Language are used to properly address the user in correspondence and to greet the user after login.
Second Section: Contact Information
-
Telephone number: landline telephone number
-
Username: if existing, a string identifying the user in the system; only mandatory if no mail exists.
-
Email: email of the user; mandatory, as this is the primary way to identify the user in the system and at the same time the Login Name
-
Mobile Number: an additional communication channel; may be useful for MFA. Use a plus followed by the country code, the area code, and the telephone number. No blanks.
-
Unvalidated email address: for alternative mail addresses
Third Section: Technical Information
-
Source*: The source of the user object. Use “LM_REGISTRATION” for users created with the IMS-Tool.
Fourth Section: Login Information
-
Password: reserved to administrator; the password of the user object.
-
Confirm Password: reserved to administrator; to confirm the password above.
After you confirm the entries with the button “save” on the right side of the panel, your input will be checked for formal errors. Please make sure that you correct all the errors and receive the message that the information has been successfully saved. After successful storage the entry will be put in edit mode, and you have the option to adjust it further. Please refer to the chapter “Managing User” for a detailed description of this operational step.
Managing Users
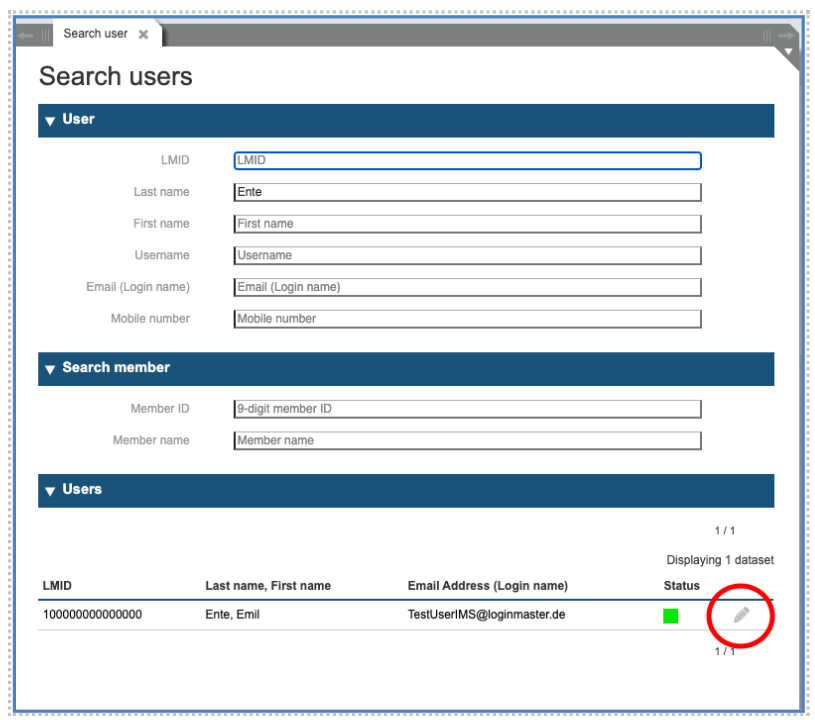
To manage a user, after you start in the main panel the function “Users”, you can enter a few search criteria of the system in the search dialog. Then press the “search” button on the right side:

On the list that the system will display, you may select the user to manage by clicking on the pencil symbol on the right side.
As a result, the system will show the panel with all the personal information stored for the selected user with the possibility to manage it. We are going to discuss this in the following sections.
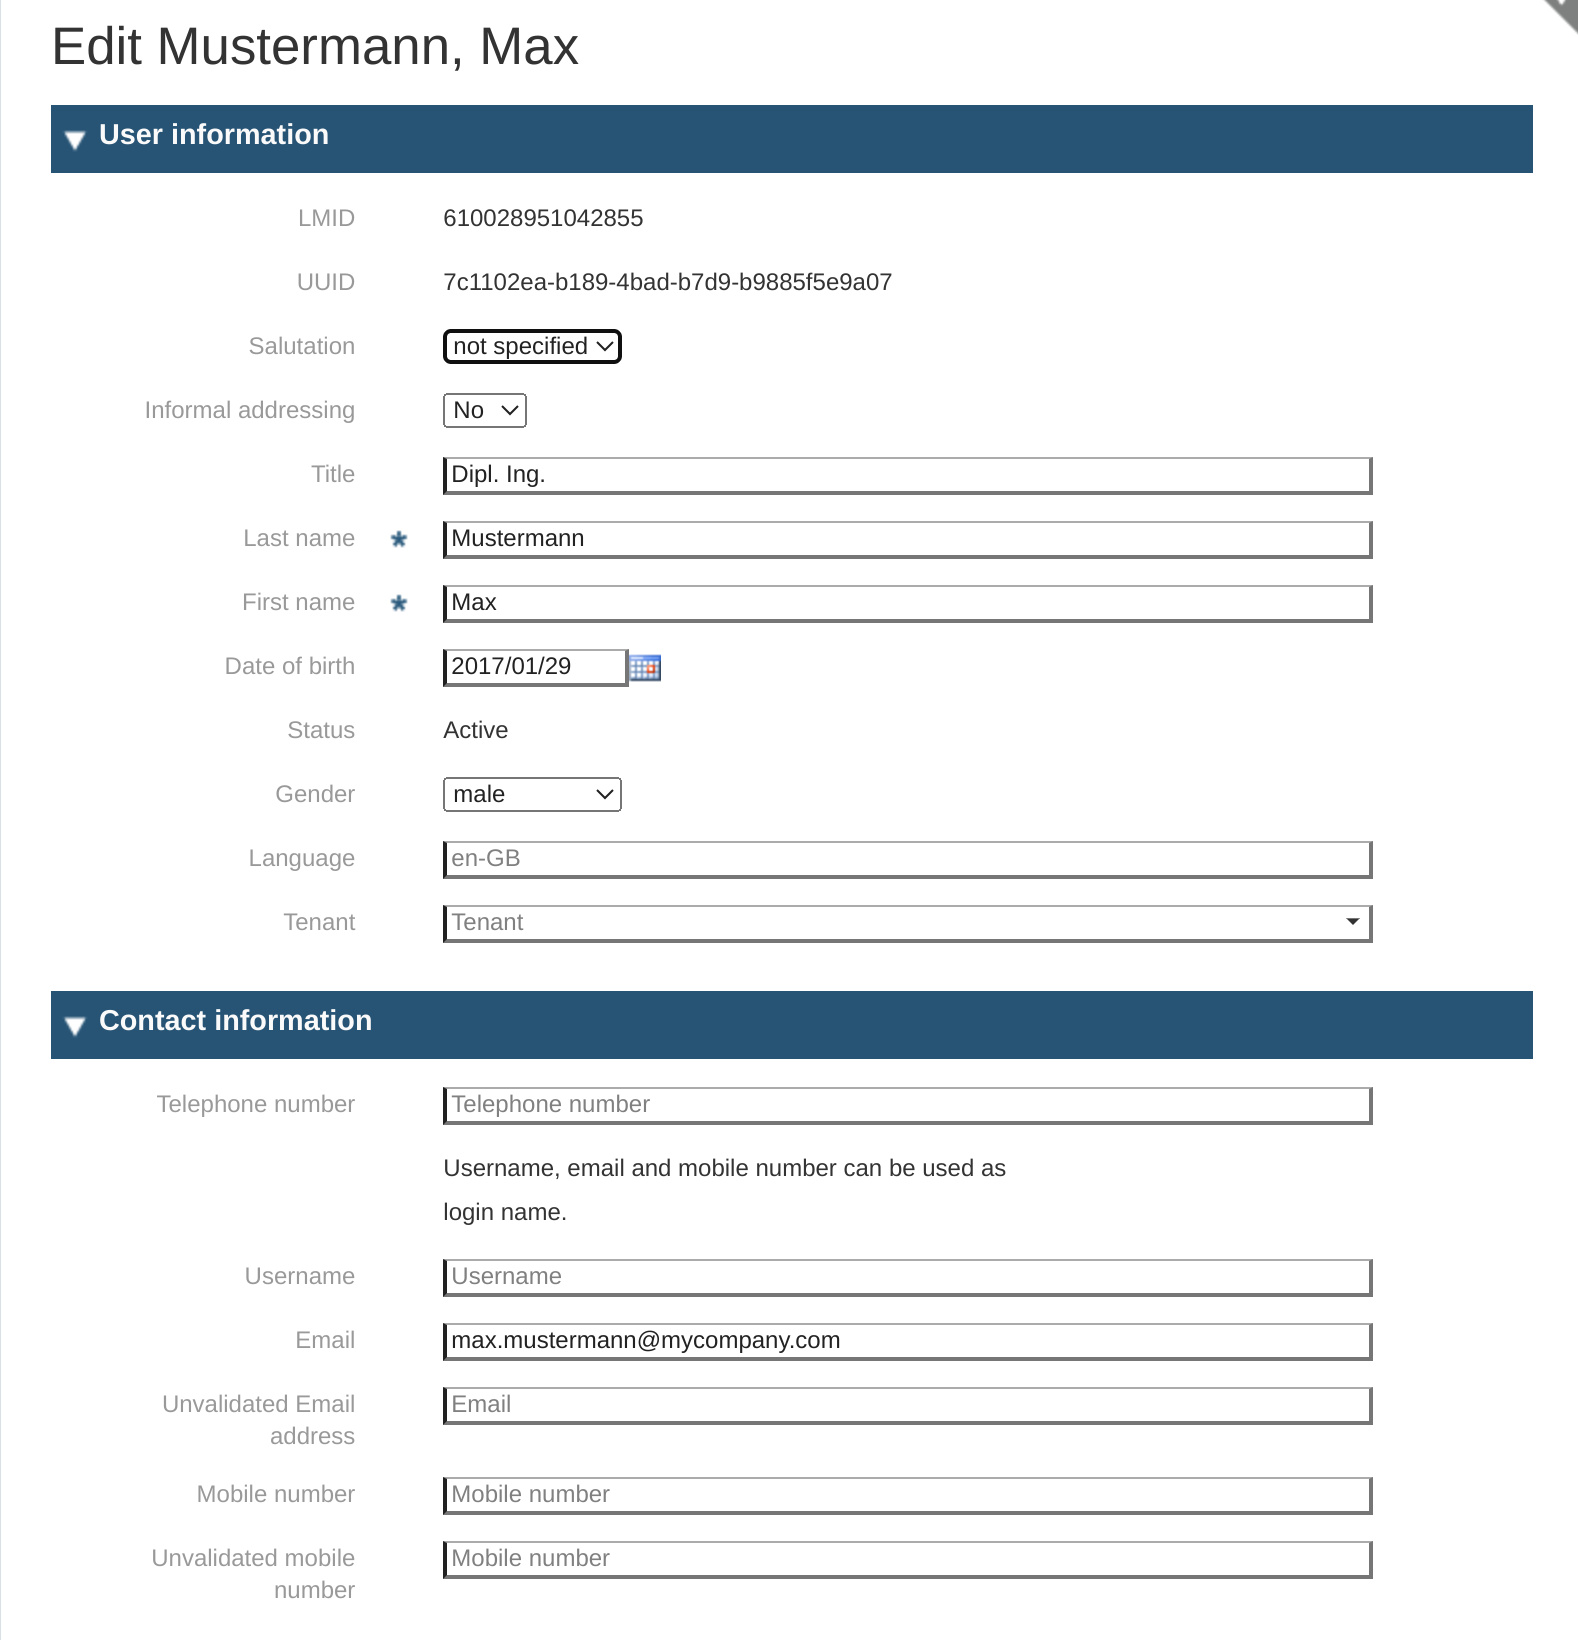
Edit view of another user object is shown below
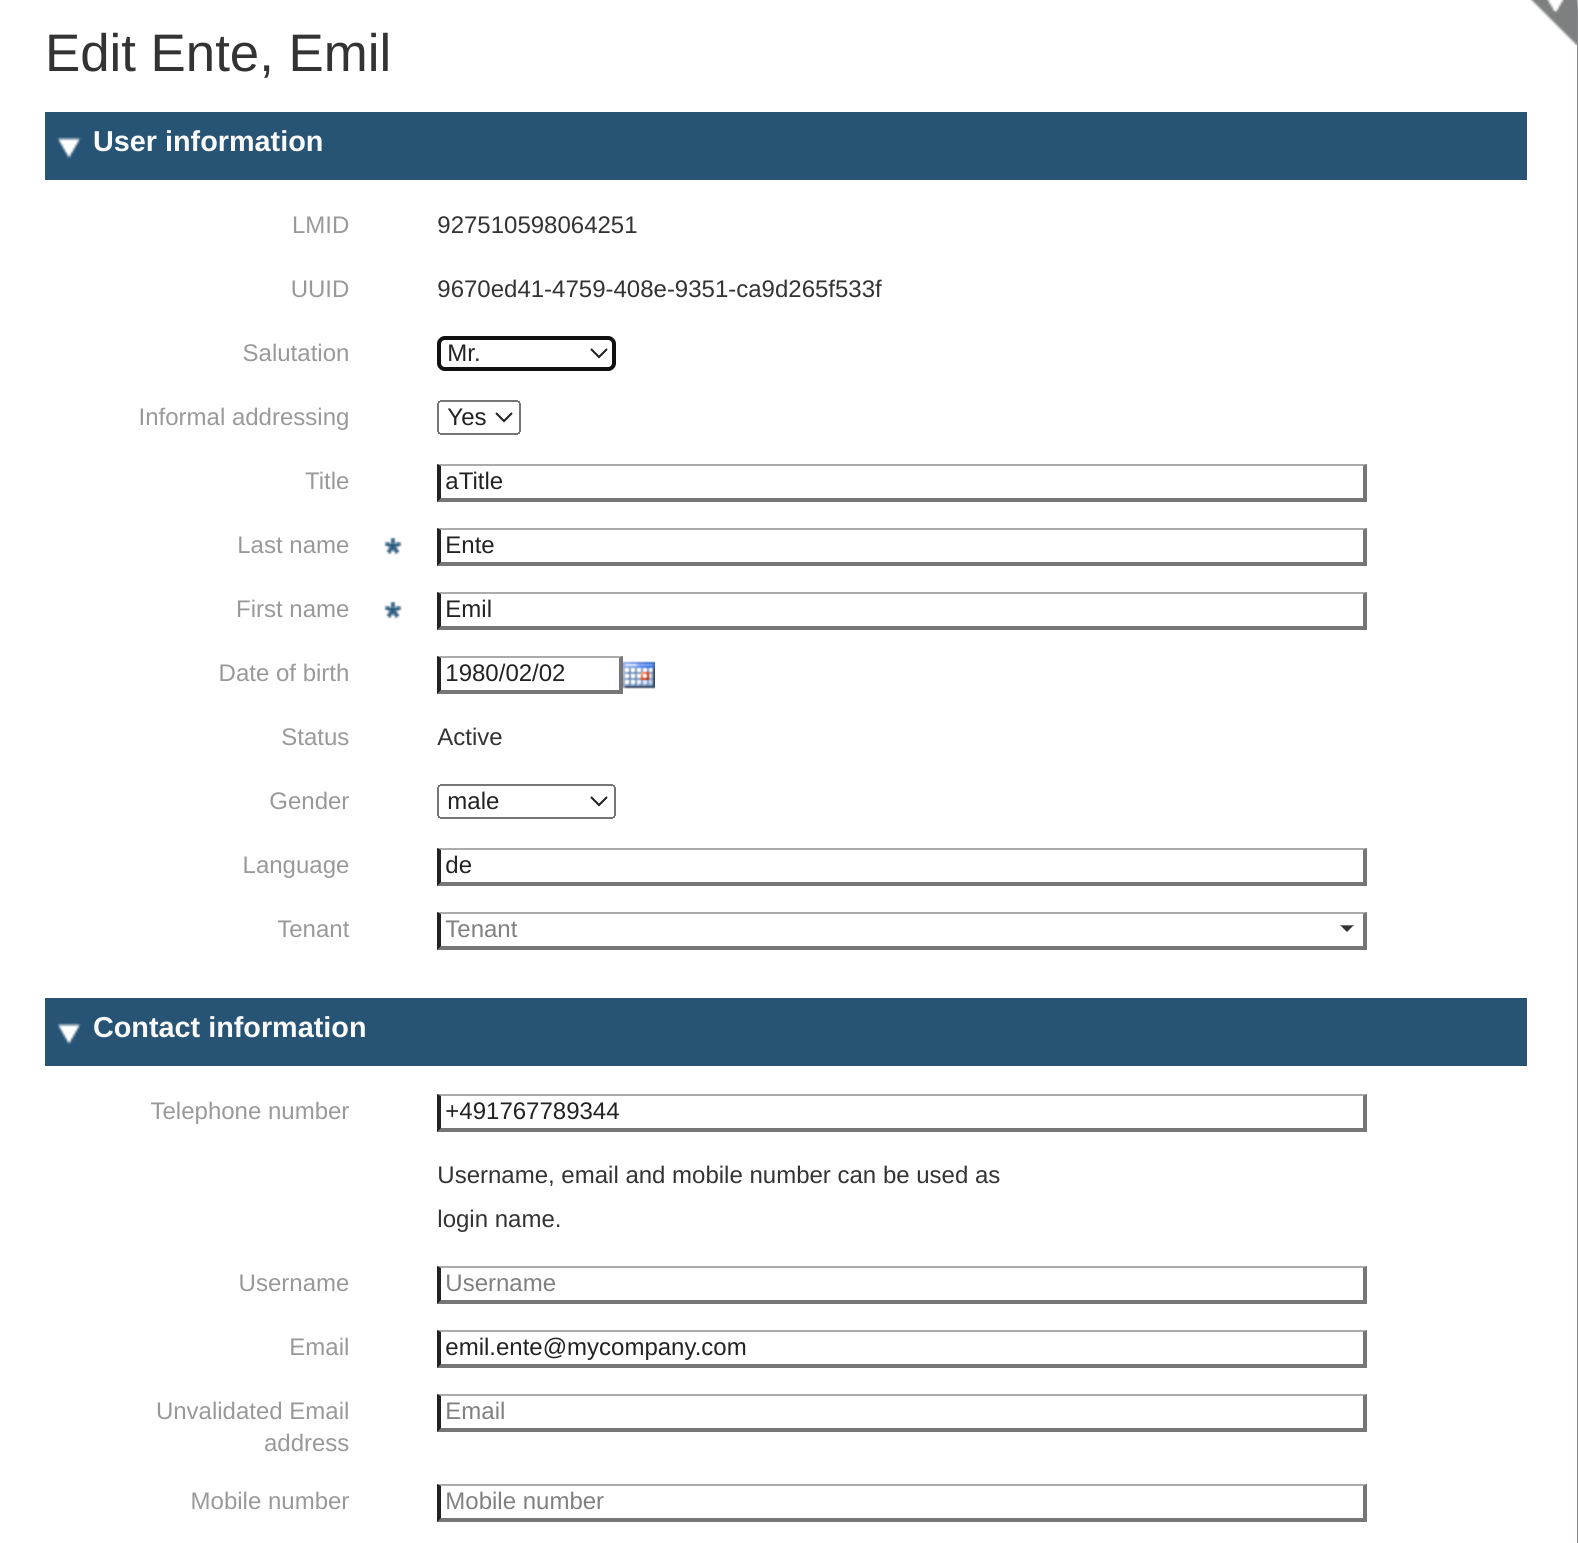
Section 1: Personal and Contact Information
-
LMID: the internal id used by the system to identify the user object; this information is only displayed.
-
UUID: is also an id that is used for uniquely identify an object or entity on the internet; this information is only displayed.
-
Salutation: selection of Mr./Mrs.
-
Informal addressing: selection of yes/no.
-
Title: free text
-
Last Name*: the family name of the user
-
First Name*: given name of the user; to properly address the user in the correspondence
-
Date of Birth: The birthdate of the person for which the User Object is being created. This may be useful to uniquely identify the user.
-
Status: display only
-
Gender: the gender of the user
-
Language: preferred language
-
Tenant: Tenant for which the user is being created.
-
Telephone number: landline telephone number
-
Username: If existing, a string identifying the user in the system. Only mandatory if no mail exists.
-
Email: email of the user; mandatory, as this is the primary way to identify the user in the system and similarly the Login Name.
-
Unvalidated email address: for alternative mail addresses
-
Mobile Number: an additional communication channel; may be useful for MFA. Use a plus followed by the country code, the area code, and the telephone number. No blanks.
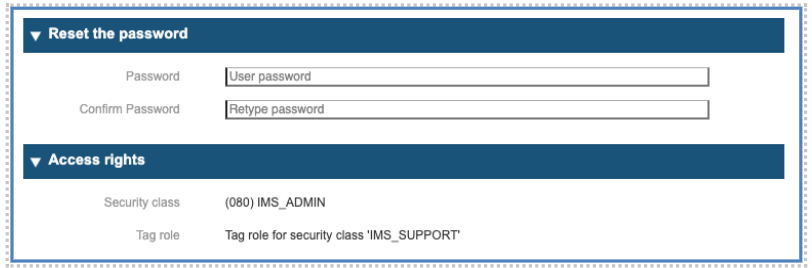
Section 2: Password and Security Class information
-
Password: input in this field the new password for the user
-
Security Class: indication of the Security Class assigned to the user
Section 3: Role Assignments

-
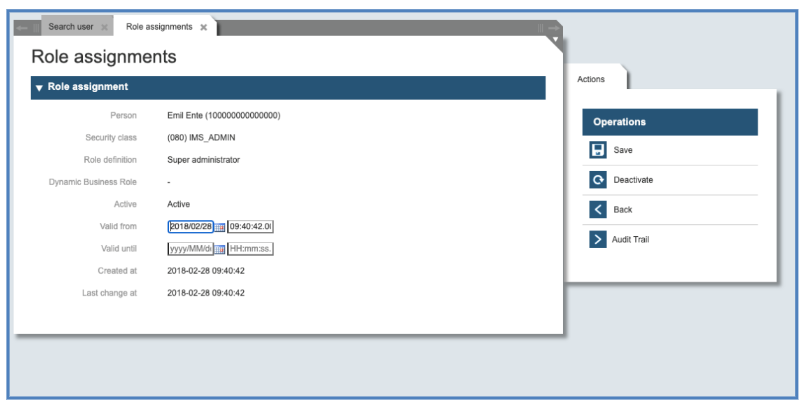
Changing role assignments
a) Click on the pencil to manage the assignment
b) Click on the switch symbol to deactivate the role assignment
c) Click on the bin to delete the assignment
-
Adding roles
a) Click on the “+” (on the top right) to add a role
To 1. Changing role assignments
To manage a role assignment, click on the pencil icon and the system will show the following dialog, where you can change the validity dates and deactivate the role assignment, too.
To 2. Adding roles
To add a role assignment, click on the plus-sign at the top on the right side and you will receive a Role Selection Panel (The list of displayed Roles can change with the associated “Role Catalog”)
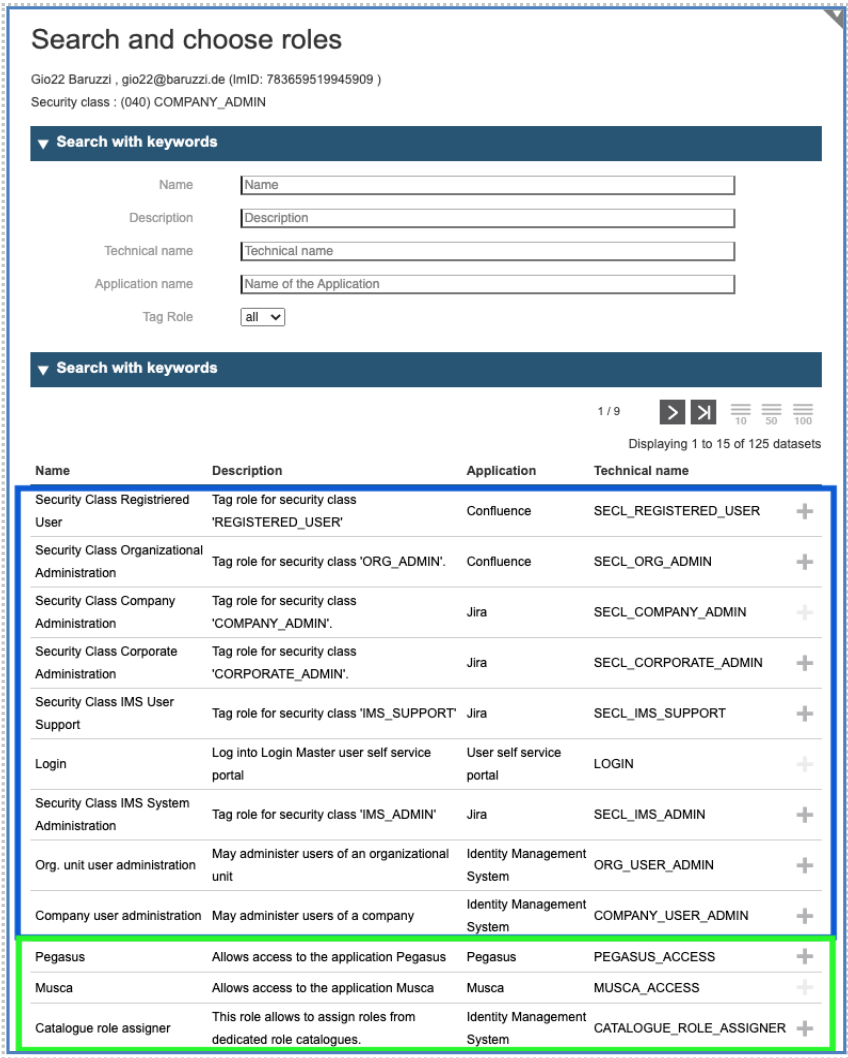
The list shows two types of roles: the roles in the blue box are the so called “tag-roles” whose effect is only to change the security class of the user, while the roles in the green box are real application roles.
So called “tag-roles” are roles, which exist to differentiate between various permissions for the IAM service itself, like the user is “able to login”, “able to do administration work”, “able to act as a delegated administrator” and so on.
Instead of this, the application roles depend in terms of number and types on the connected applications. They are individually defined according to the different permission levels/roles of an application.
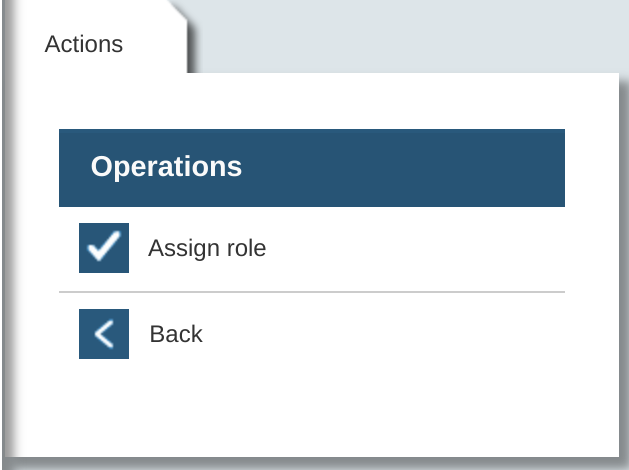
Once you identified the Role to grant, click on the plus icon on the right side to proceed in the process to grant it.
Section 3a: First Case - simple role without parameters
Adjust the validity dates for the grant and confirm the assignment clicking on “assign role” checkbox on the right side.
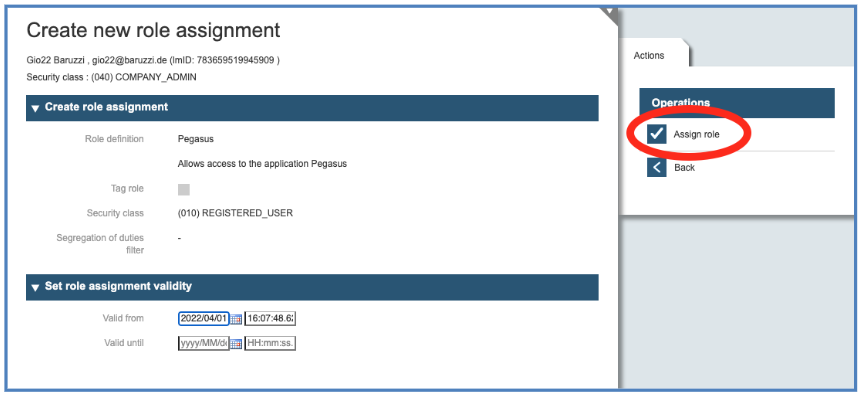
It is always possible to limit the validity of a role assignment without a manual intervention at the time, the role assignment should expire. To limit the role assignment in time, fill out the box “Valid until” on the bottom of the role assignment mask. The system will automatically deactivate the role assignment when the validity expires.
Section 3b: Second Case - role with parameters
If the role requires parameters, you may specify those at the bottom. If the parameters are multiple, you may click on the plus-sign at the bottom to add values.
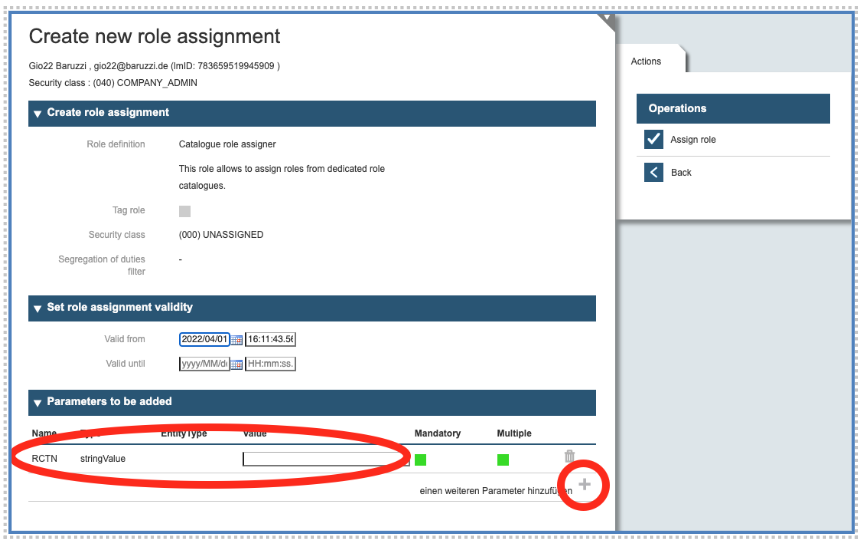
A role parameter offers the possibility to add fine-grained information to a role to differentiate similar roles from each other. Example: The role can be a role to assign roles from a role catalogue (“Catalogue role assigner”). As there could be different role catalogues, the parameter defines which role catalogue is meant. The assigned role is then dedicated/limited to a certain role catalogue, which is defined by the value of a specified parameter.
Section 4: Organization
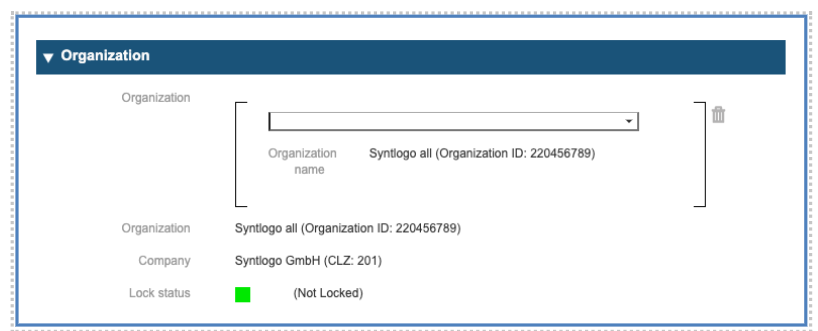
Above you see the mask for connecting user and organizations or organizational units (one hierarchy below organizations) with each other. We have chosen these designations because most of our customers have this organizational structure (for further explanation, see chapter 5). Indeed, it is possible to change designations and to add a broader or a higher tree(s) to the IMS related organizational structure for managing affiliations of users and their permissions.
The organizational structure here is the following:
Organization: Syntlogo all
Company or Organizational Unit: Syntlogo GmbH
The “Lock status” gives information about the availability of an organization. If the status is “locked”, the user cannot be affiliated with that organization.
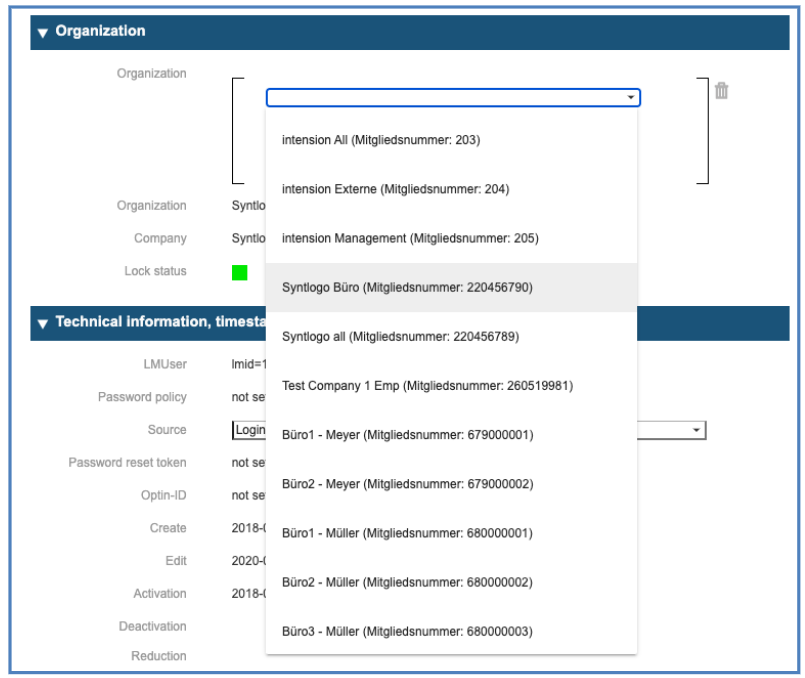
By clicking on the combobox arrow of the Organization, you receive the list of possible Organizations or Organizational Units to which the user can be associated: Note: To limit the list of the resulting drop down, input a search criterion in the search field
Organizations
The function “Organizations” allows to create and manage Corporations, Companies and Organizational Units.
Create a new Corporation
The first step to create a new Corporation is to call the function “Organizational Unit”. As the dialog “Search organizations” and possible “Actions” will be displayed, choose in the right panel the action “Create a new organization”.
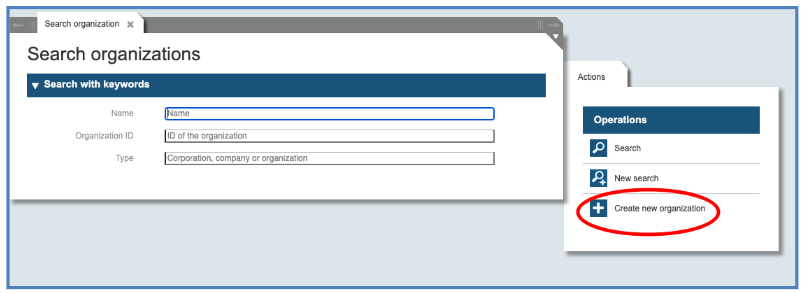
Fill the Fields:
-
Name: The abbreviation of your enterprise assigned to you by the System Administrator
-
Organizational Unit ID: The ID of your enterprise assigned to you by the System Administrator
-
Description: a free short descriptive text
-
Organizational Unit type: choose “Corporation”
-
Do not Enter anything in the field “Parent Unit”.
-
If the Organization is configured as new tenant, select the corresponding “Tenant” from the drop-down list (here: “myTenant”).
Note: In the current implementation, the top organization is defined as “Corporation”. This may be redefined at project level according to customer needs.
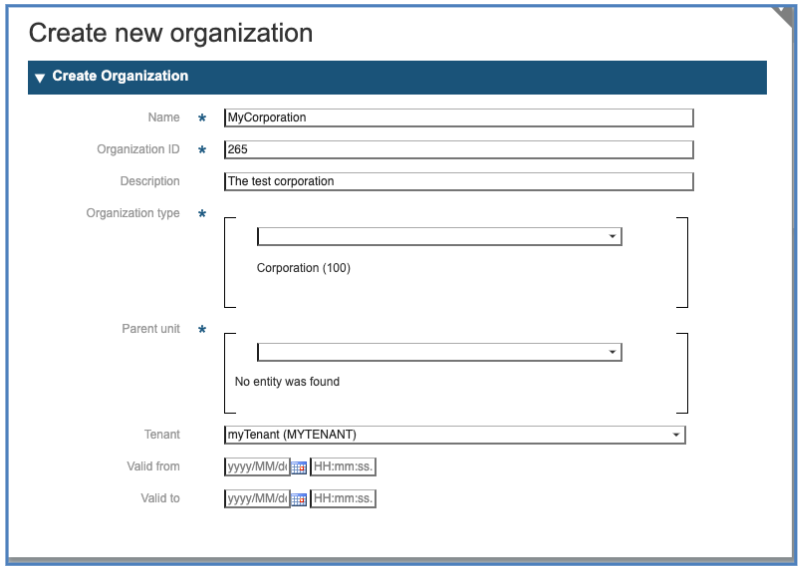
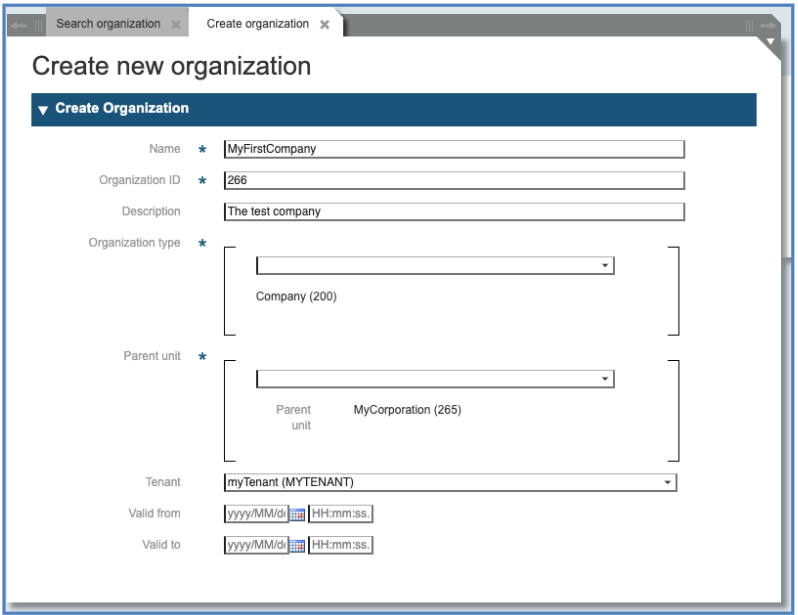
Create a new Company
After you created a Corporation, you may create the first company. To create this, you call the function “Organizations” and select “Create new Organizations” again. Filling in the form, you refer to the just-created Corporation.
Fill the Fields:
-
Name: The Name of your company assigned to you by the System Administrator
-
Organizational Unit ID: The ID of your company derived by the ID of the Corporation (in example 266). It must be numeric and contain only three digits.
-
Description: a free short descriptive text
-
Organizational Unit type: choose “Company”
-
Enter the ID (or part of it) of the parent unit in the field “Parent Unit” and select the appropriate Unit from the drop-down list.
-
If the Organization is configured as new tenant, select the corresponding “Tenant” from the drop-down list.
Create a new Organizational Unit
To create an Organizational Unit (OU) inside a Company that you created, repeat the same steps as for Corporation and Company. Call the function “Organizations” and select “Create new Organization” again. Filling the form, you refer to the existing Companies. Fill the Fields:
-
Name: The name of your Organizational Unit, agreed with the System Administrator
-
Organizational Unit ID: The ID of your company followed by a 6-digit string identifying the Unit (in example 266 and 010001). The ID must be 9 digits long.
-
Description: a free short descriptive text
-
Organizational Unit type: choose “Organizational Unit”
-
Enter the ID (or part of it) of the parent unit in the field “Parent Unit” and select the appropriate Unit from the drop-down list.
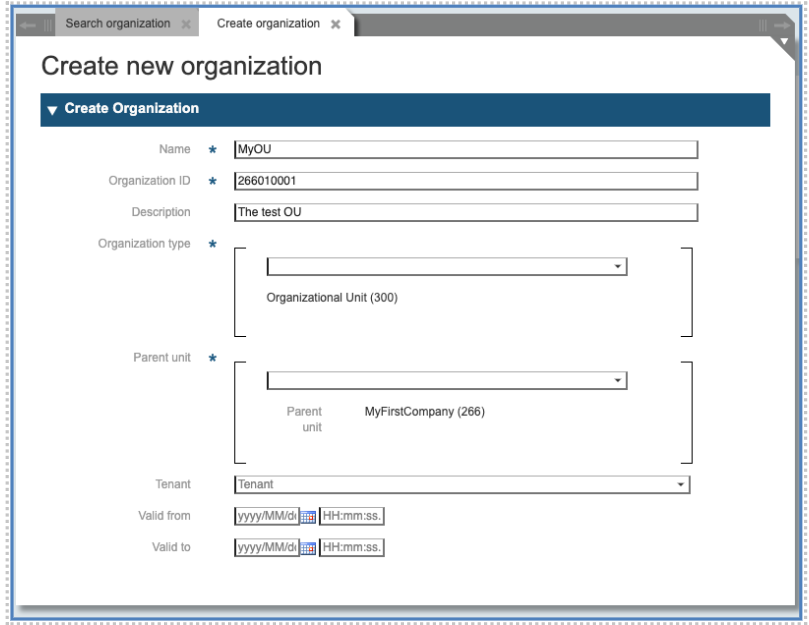
Note: In the current implementation an organization of the third or lower level is called “Organisational Unit”. The name can be changed at project level according to customer needs. There is no limit to the number of layers.
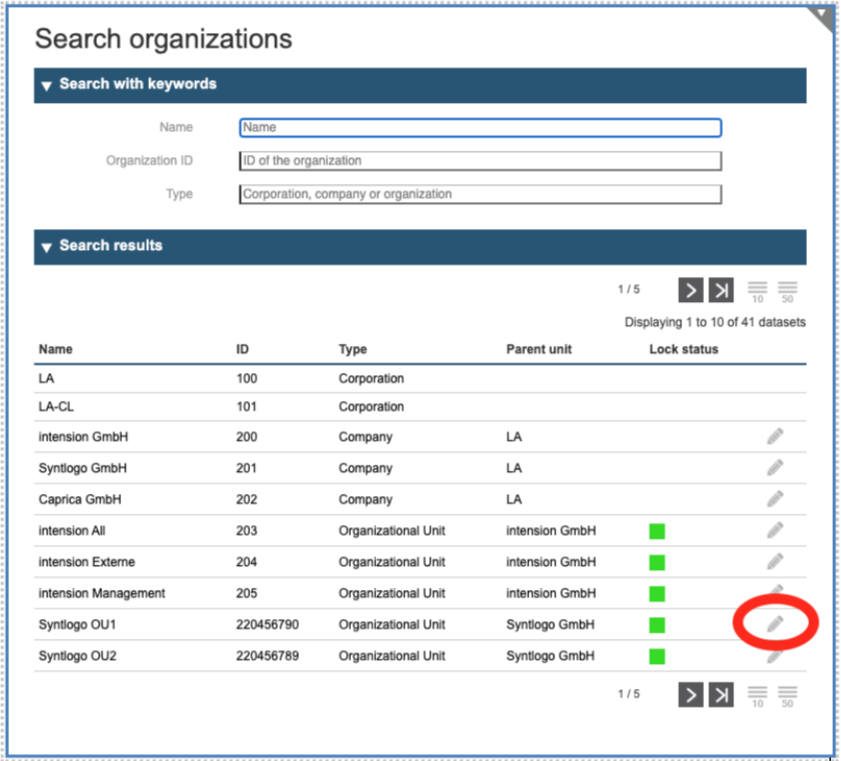
Manage existing Organizations
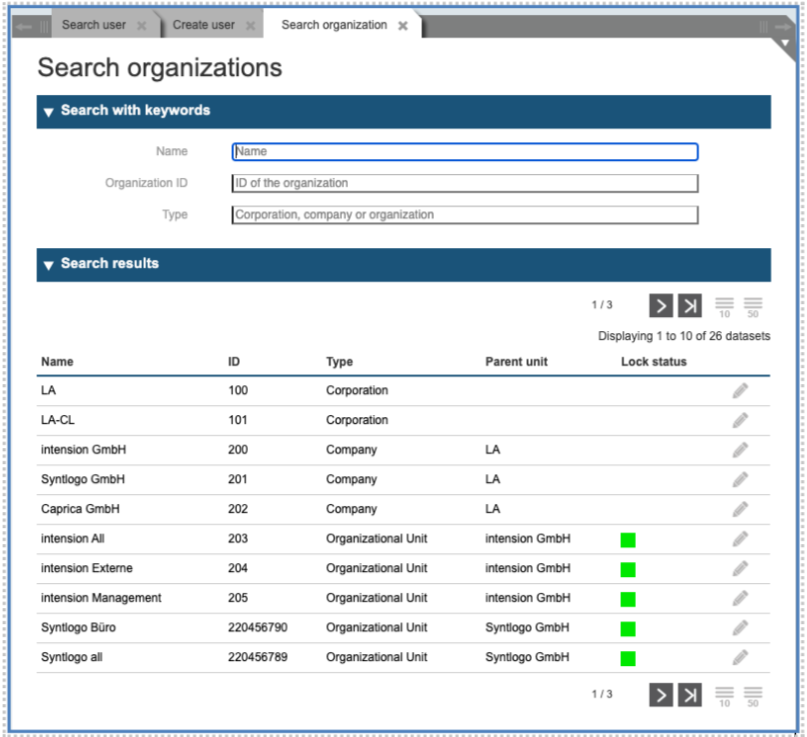
To manage an Organizational Unit or a Company that you created, call the function “Organizations” and in the resulting dialog input some search criteria to identify the Corporation, Company or Organizational Unit that you want to manage:

The result will be a panel like the following:

The system shows a list with all types of organizational objects (Corporation, Company or Organizational Unit), which match the search criteria. In the list you can see the Name, the ID number, the Type, the Parent unit and the Lock status. Figure 25 shows one object, which is not locked (“MyOU”), whereas the higher lying objects are locked and cannot be changed at this moment.
To manage the Organizational Unit “MyOU”, click on the pencil symbol on the right side to access the administration panel of this unit.
A management panel opens for editing:
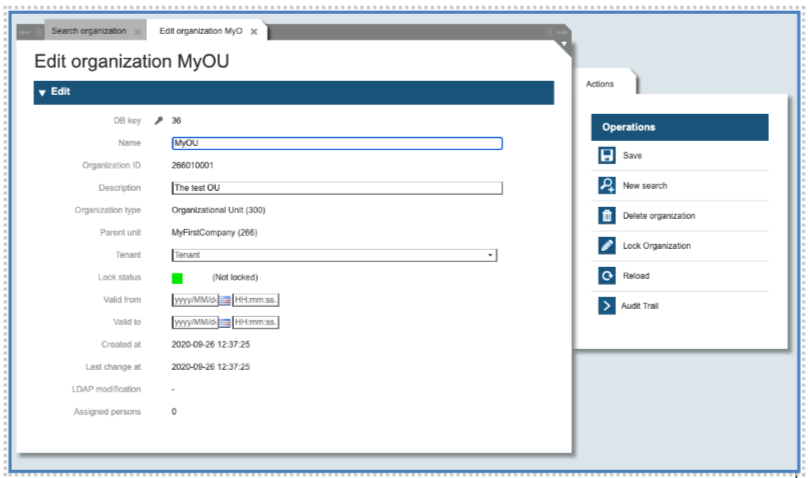
You can change the name of the organization or the tenant. You cannot change the parent unit. You can change the lock status just by clicking on the button “Lock Organization” on the right-side menu.
A locked Organization can be unlocked by clinking on the “Member unlocking” on the right-side menu.
You can insert the validity date and time (Valid from, Valid to) on the same panel. Organizations with a limited validity will automatically be locked by the system starting from the given end date.
Manage Users in an Organisation
After you select on the Left side the Menu “Organizations”, select the dialog “Search organizations” and search für your desired Organization.

In the resulting list, you can page back and forward using the arrows at the bottom. Once you identify the desired Organization, you can click on the “pencil” icon on the right to display the information related to it.
In the resulting panel you manage the information of the Organization and the user associated to it. (The list shows only the user directly assigned to the Organization and not the users in sub-organisations.)
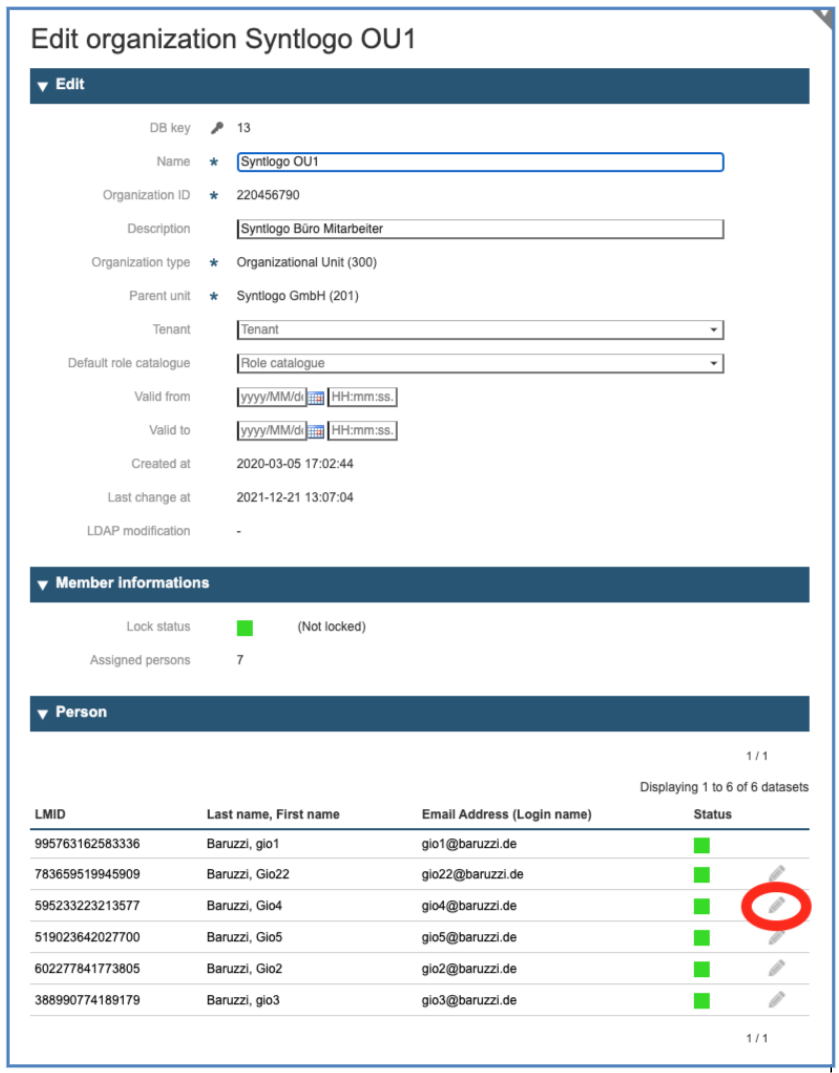
To manage a user, identify the user in the list at the bottom and click on the pencil icon on the right. To manage a user, you do not have to go through the panels of the organizations.
Applications
Application objects in the IMS Tool represent the application objects of the SSO Realm. Most of the information about the application is managed by the SSO. In the IMS we only manage the details relevant for the User Lifecycle, according to the Application Roles connected to the application.
Create a new Application
Hint: The capability to create or manage an Application is enabled by the Role “APPLICATION_ADMIN” and the Security Class IMS-Administrator (80)
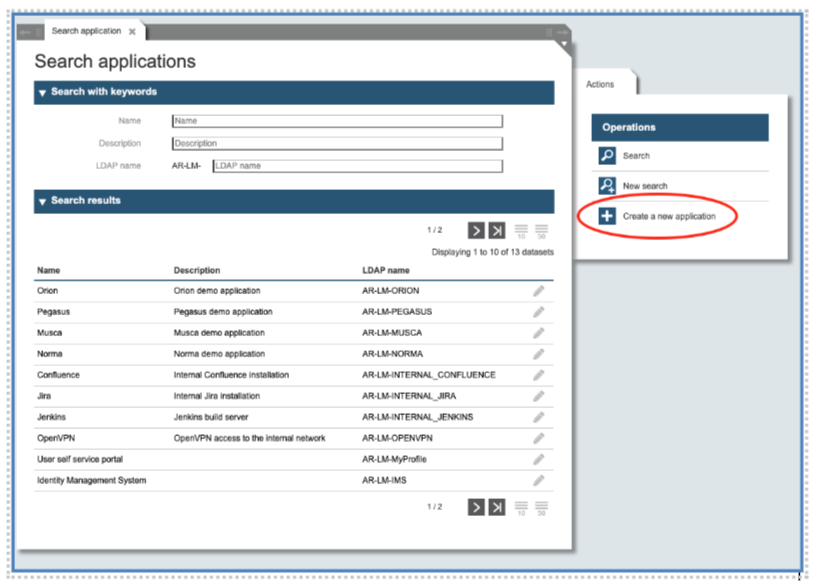
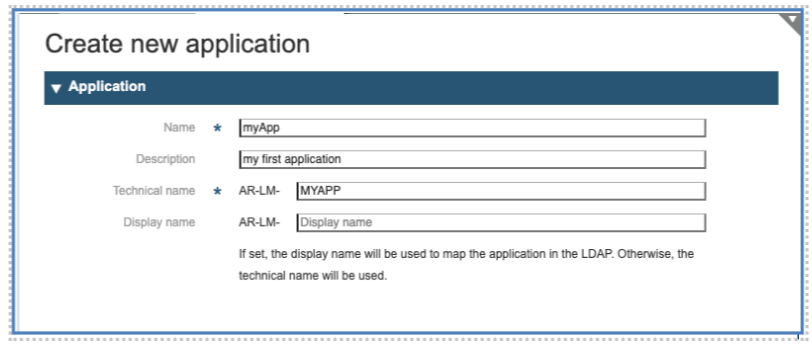
To create a new application object, start calling the function “Application” in the Group “Applications” on the left side of the main panel. After opening “Search Applications”, click on “Create a new application” on the right side.
In the resulting panel, fill the following fields:
-
Name*: The Name of your Application, this should be a string used to identify the application inside the IMS-Tool.
-
Description: a free short descriptive text
-
Technical Name*: the name under which the application will be known in the SSO.
-
Display name: if needed, a different name to be exported to LDAP.
Manage existing Applications
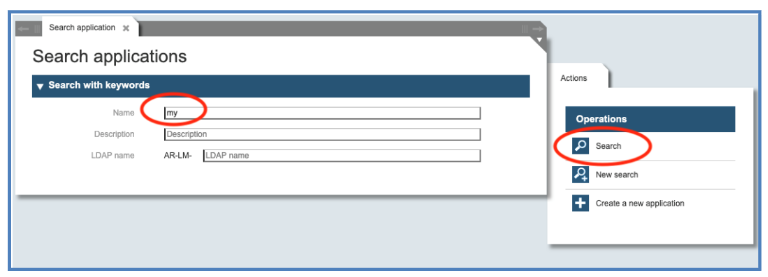
Hint: The capability to create or manage an Application is enabled by the Role “APPLICATION_ADMIN” and the Security Class IMS-Administrator (80)
The first action to manage an application is to call the function “Application” and specify one or more search criteria, like a substring of the application name. Then press the button “Search” on the right side:
The resulting panel allows us to display the applications corresponding to the search criteria and to select the one to be managed. To edit the application, click on the “pencil” icon on the right side:
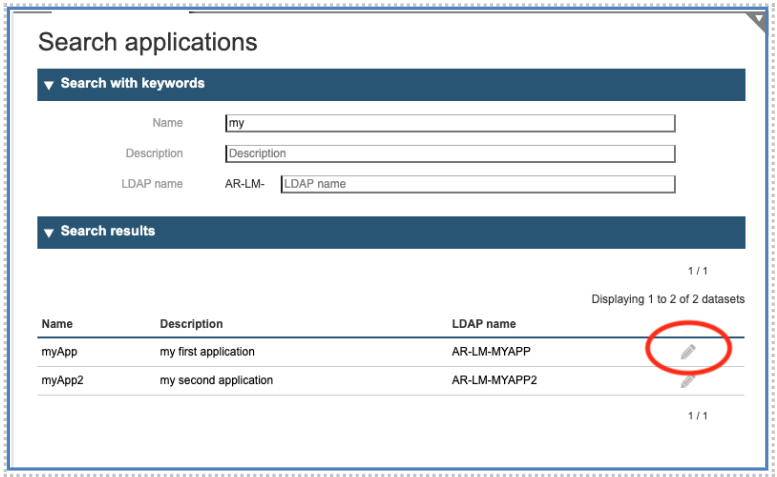
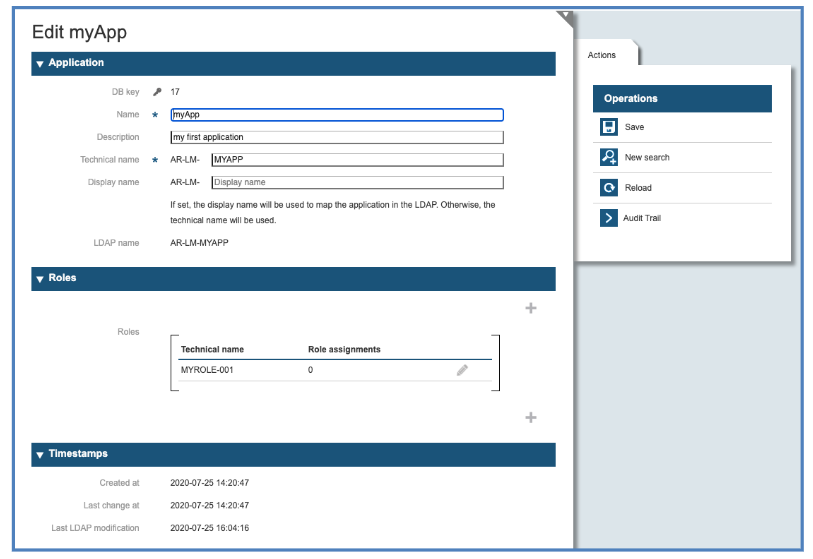
As result the application object will be shown, and the user can modify the attributes.
Roles
The roles in Login-Master are strictly application roles and tell the application itself which capabilities the user owns. The application itself must specify the name of its roles and must connect them internally to capabilities. Login-Master takes over the task of storing the name of the roles connected to this application, grant or withdrawn them from users and deliver them at session time to the application in the name of the user.
The IMS Tool offers the administrator the capability to define and manage the roles. From the main panel, the administrator activates the function “Roles” and follows the instruction on the screen.
Create a new Role
Hint: The capability to create or manage an Role is enabled by the Role “ROLE_ADMIN” and the Security Class IMS-Administrator (80)
To create a role, the administrator must activate the function “Roles” on the main panel and, as the panel “Search roles” appears, click on the button “Create new roles” on the right side.
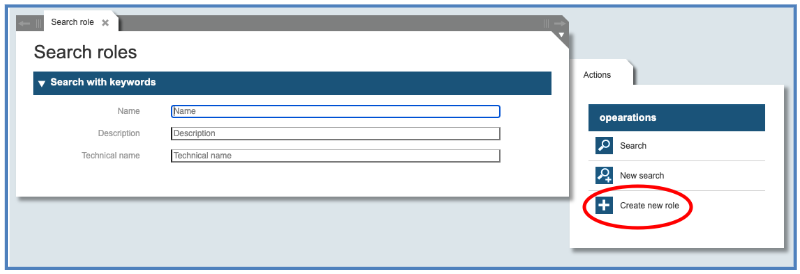
The resulting panel allow the definition of the new role:
-
Name*: The name of your Role, a string used to identify the Role inside the Application and the IMS-System.
-
Description: a free short descriptive text
-
Technical Name*: This is the role name used inside the User Registry and the SSO. It should not contain blanks.
-
Application Drop-Down*: select from the drop-down list the application for which this role is being defined.
-
Validity period (in days)
-
Valid from: First date to grant the role
-
Valid to: Last date to grant the role
-
Active: Specify if the current role is currently active or not.
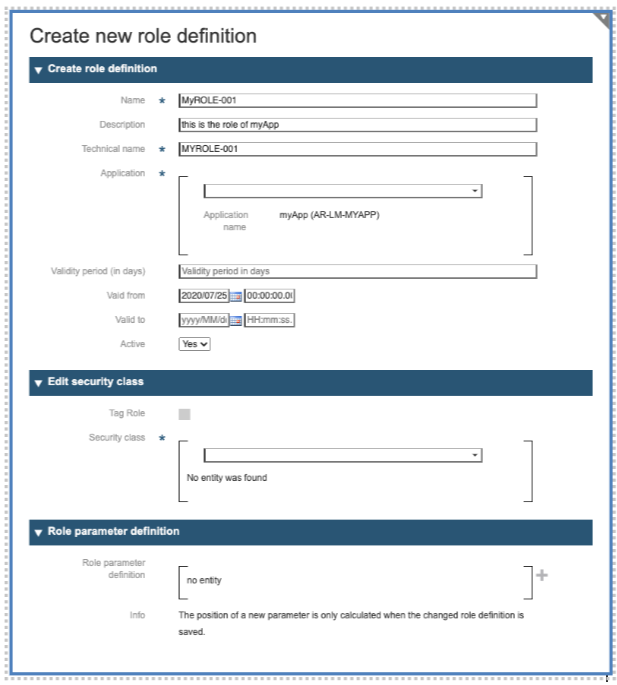
The second section is dedicated to the Security Class. The roles have an increasing level of sensitivity and not everybody can grant them to users. This is being specified by the Security Class: It defines which security level a user must have to be able to grant the current role. In the current example, to grant the role, the user of the IMS-Tool must have at least the Security Class “(040) COMPANY_ADMIN”.

The classes in the IMS are:
-
(010) REGISTERED_USER
-
(020) DELEGATED_ADMIN
-
(030) ORG_ADMIN
-
(040) COMPANY_ADMIN
-
(050) CORPORATE_ADMIN
-
(070) IMS_SUPPORT
-
(080) IMS_ADMIN
Every role can have one or more optional parameters (One example about roles with optional parameters can be found in [Delegated Administration](Section10_DelegatedAdministration.html) under “Define a Corporate Administrator”). The definition of the role parameters can be made using the third part of the role definition:

To define a parameter for the current role, you should press on the plus sign at the right of the dialog. This will open a second dialog: “Add role parameter definition”. With this dialog you may specify the attributes of the role parameter:
-
Name*: The name of the parameter, a string used to identify the parameter inside the Role and inside the Application.
-
Description: a free short descriptive text
-
Type *: use the drop-down list to select one of Boolean, Integer, Float, String, Long String, Date, Entity as for the type of parameter
-
EntityType
-
Format Pattern
-
Mandatory*: specify if the role parameter is mandatory during grant
+ Multiple: specify if the parameter is single valued or an array.
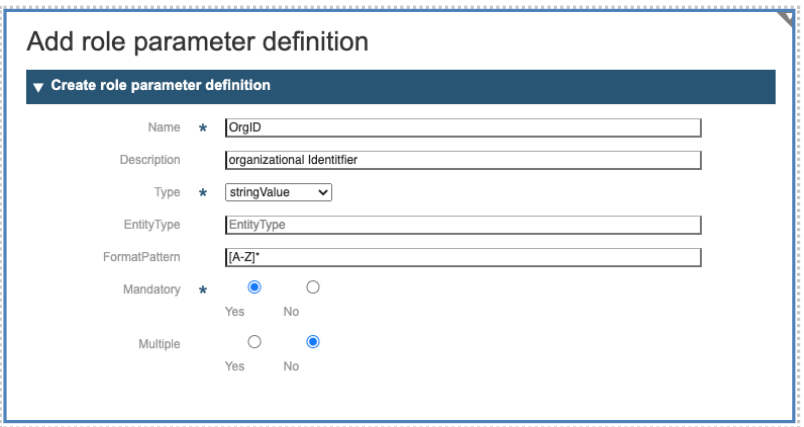
After you completed the parameter definition, the system will display the resulting role definition, ready for editing:
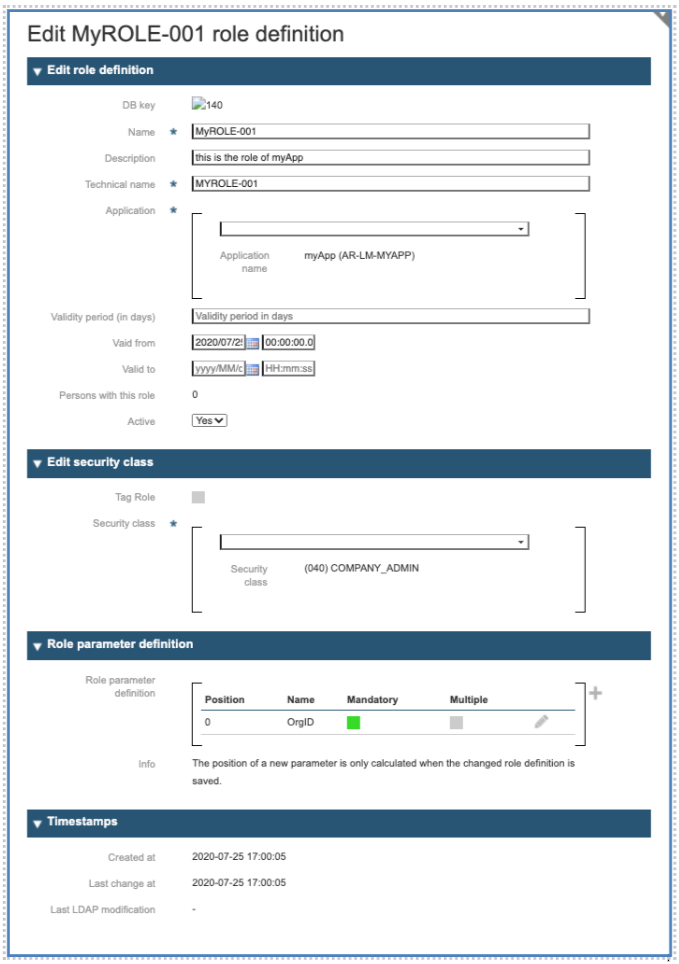
Manage existing Roles
Hint: The capability to create or manage an Role is enabled by the Role “ROLE_ADMIN” and the Security Class IMS-Administrator (80)
The management of roles can be accessed selecting the item “Roles” in the main menu of the IMS on the left side.
The dialog Search roles is opening by clicking on Roles. It allows the quick selection of existing roles. The possible actions are listed on the action bar on the right side.

As a result of the action “search”, the following menu is displayed:
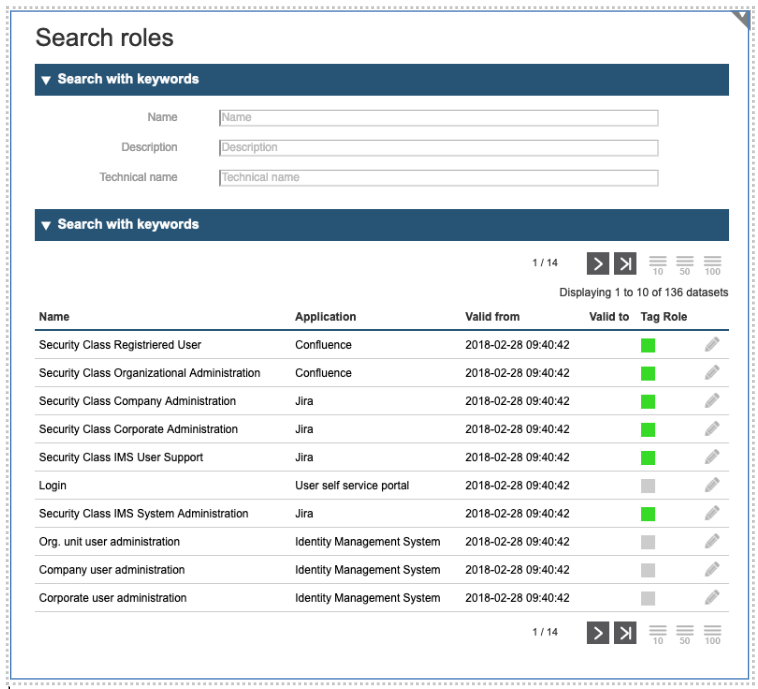
You can use the paging buttons at the bottom to find the role you are interested in. In the above figure, you can see a list of all existing roles. To search for a certain role, you must specify the search criteria and repeat the search for selection.
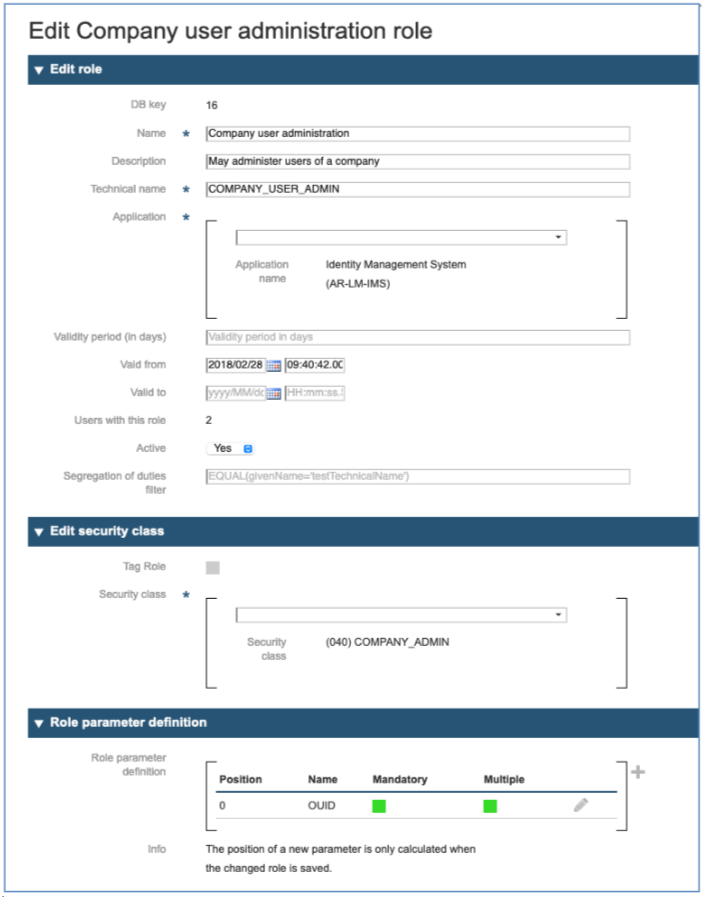
Once the role to manage is listed on the screen, you can access it by clicking on the pencil symbol on the right side. Getting the following dialog, where you can control all the attributes of the role, including the name, the security class, and optional parameters to perform fine granular access control.
In the following all role fields are explained. Not all fields can be modified. Fields with * are mandatory.
Edit role - here are changes for the role itself possible.
-
DB Key: fixed field, / no change is possible; contains the information of the corresponding number in the database
-
Name*: name of the role
-
Description: a free short descriptive text
-
Technical name*
-
Application*: corresponding application to which the role belongs to
-
Validity period (in days): duration of role validity in total
-
Valid from: starting date of the validity
-
Valid to: end date of the validity
-
Users with this role: number of users owning this role
-
Active: information about the role status (active/not active)
-
Segregation of duties filter: information, if this role cannot be assigned; if the user already has another role that does not allow this additional role to be executed for compliance reasons. Or vice versa. The filter must be set in the form of a formula, see description in the Planning & Deployment Document.
Edit security class - here are changes for the security class of the role possible.
-
Tag role – The line contains the information if this is a tag role or not.
-
Security class* - mandatory field: single selection / change of security class
Role parameter definition
Business Roles
Dynamic business roles are a set of roles including tag roles assigned to a person automatically by changing some attributes of person and dynamic business roles.
How assignments happen?
Hint: The capability to create or manage an Role is enabled by the Role “ROLE_ADMIN” and the Security Class IMS-Administrator (80)
There are two agents in the IMS are responsible for this dynamic business roles assignments:
-
RoleAutoAssignmentAgent - After changing a dynamic business role, checks whether the role needs to be assigned to new people.
-
RoleAutoAssignmentFromPersonAgent - After changing a person, checks whether additional dynamic business roles need to be assigned to them.
Neither agent is scheduled to run but start immediately after a dynamic business role or person has been changed.
To minimize the system load and not have to check all business roles every time a person changes, or to check all persons after every change in a business role, both agents only react to changes in a few selected attributes.
If a change is detected, the ID of the changed object is passed to the agent so that the change requirement is only determined for this.
Changes to a dynamic business role are significantly more expensive than changes to a person, since when a business role is changed, all persons who match the role’s filter must be checked to determine whether they already have a corresponding role assignment or not.
Attributes of Dynamic Business Role or Person is listed below:
-
Attributes of the dynamic business role - autoAssignFilter, active and roleDefinitions.
-
Attributes of the Person - source, extensions, mailAddress, securityClass and orgUnits
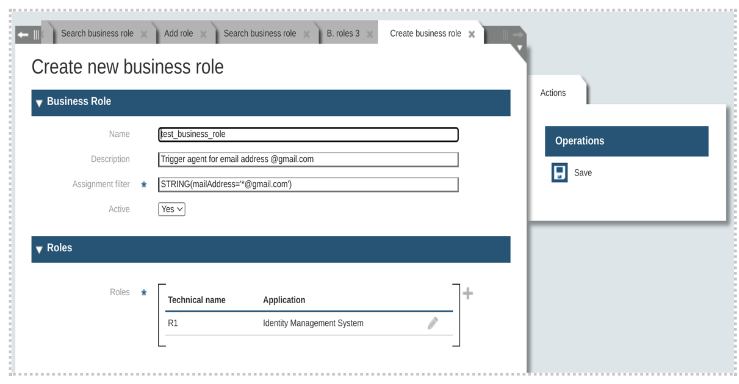
Create a new Business Role
Hint: The capability to create or manage an Role is enabled by the Role “ROLE_ADMIN” and the Security Class IMS-Administrator (80)
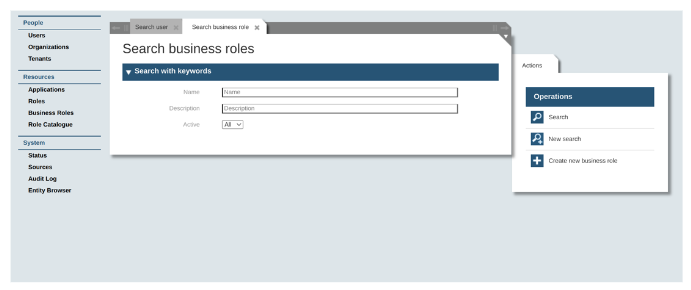
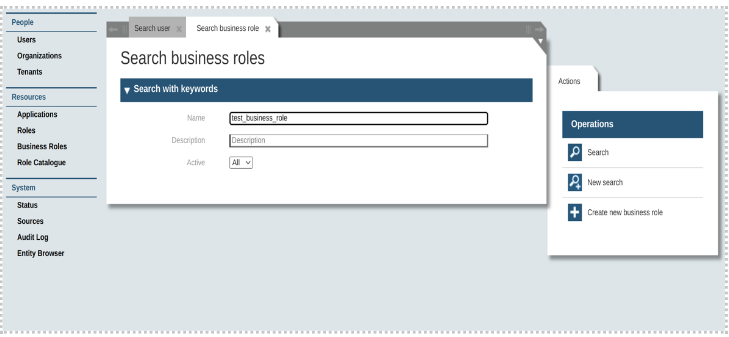
The first step to create a new business role is to call the function “Business Roles”. As the dialog “Search business roles” and possible “Actions” will be displayed, choose in the right panel the action “Create new business role”.
Fill the Fields:
-
Name: The name of your business role, a string used to identify inside the Application and the IMS-System.
-
Description: a free short descriptive text
-
Assignment filter: The autoAssignFilter on the dynamic business role is an iDoque query like (STRING (mailAddress='*@gmail.com')
-
Active: Status of the business role that could be yes or no
-
Roles: In this section you can add a set of roles that are already created and add by creating a new one.
iDoque query: Since iDome works on an object-based, logical data model, we cannot easily use SQL or LDAP filters or similar to select a set of data objects. Therefore, iDome defines its own system and language for this purpose.
To be able to use these descriptions flexibly, there is also a separate language with which they can be formulated. This is called iDoque ( iDome Query).
A simple iDoque query with EQUAL SearchConstraint -
EQUAL(lastName='Müller')
Manage existing Business Roles
When you click on the business role from the left menu, a search window will appear for business role. You can directly hit on the search button from the right side to get all the existing business role. Similarly, it also can be possible to get a specific business role by using the search filter. There are four possible ways to search business roles by name, description, active status and by combining all three filters.
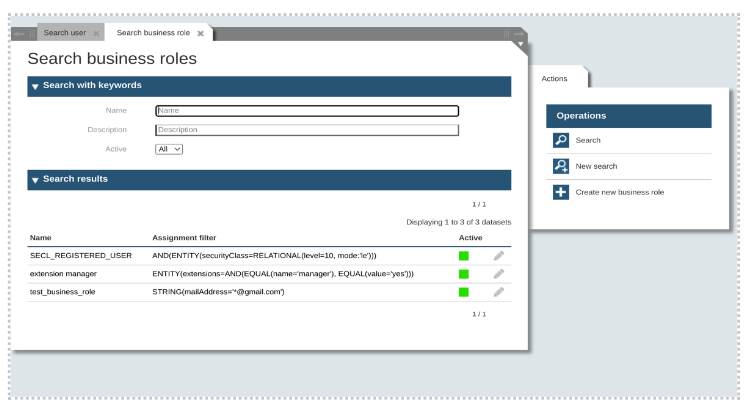
The resulting panel allows us to display the business roles corresponding to the search criteria and to select the one to be managed. To edit the business role, click on the “pencil” icon on the right side.
As result the business roles object will be shown, and the user can modify the attributes.
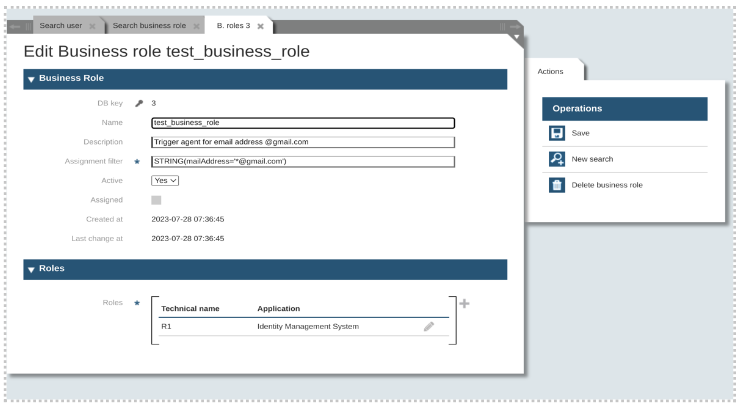
Editing and assigning new roles are possible from the Roles section. After assigning a role it is not possible to remove the role from the list.
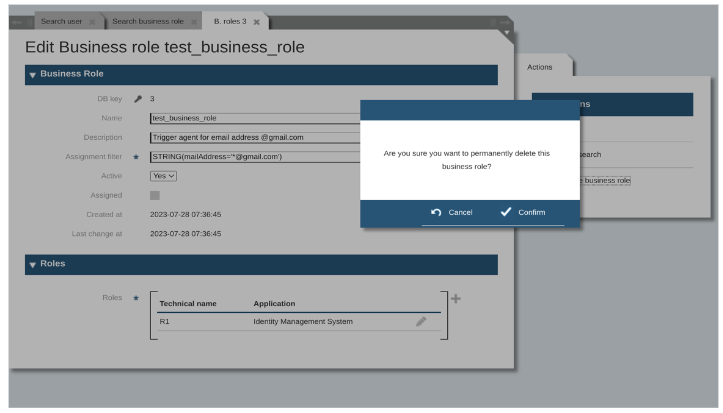
On the other hand, users can delete the current business role from the right menu.
Limitations
There are two limitations we have for business roles:
-
The autoAssignFilter on the dynamic business role is an iDoque query (like STRING(mailAddress='*@gmail.com') and should only use the Person attributes that trigger evaluation: source, extensions, mailAddress, securityClass, orgUnits.
-
Removal of roles from DynamicBusinessRole. Role Definitions will not remove the roles assigned to the Persons already.
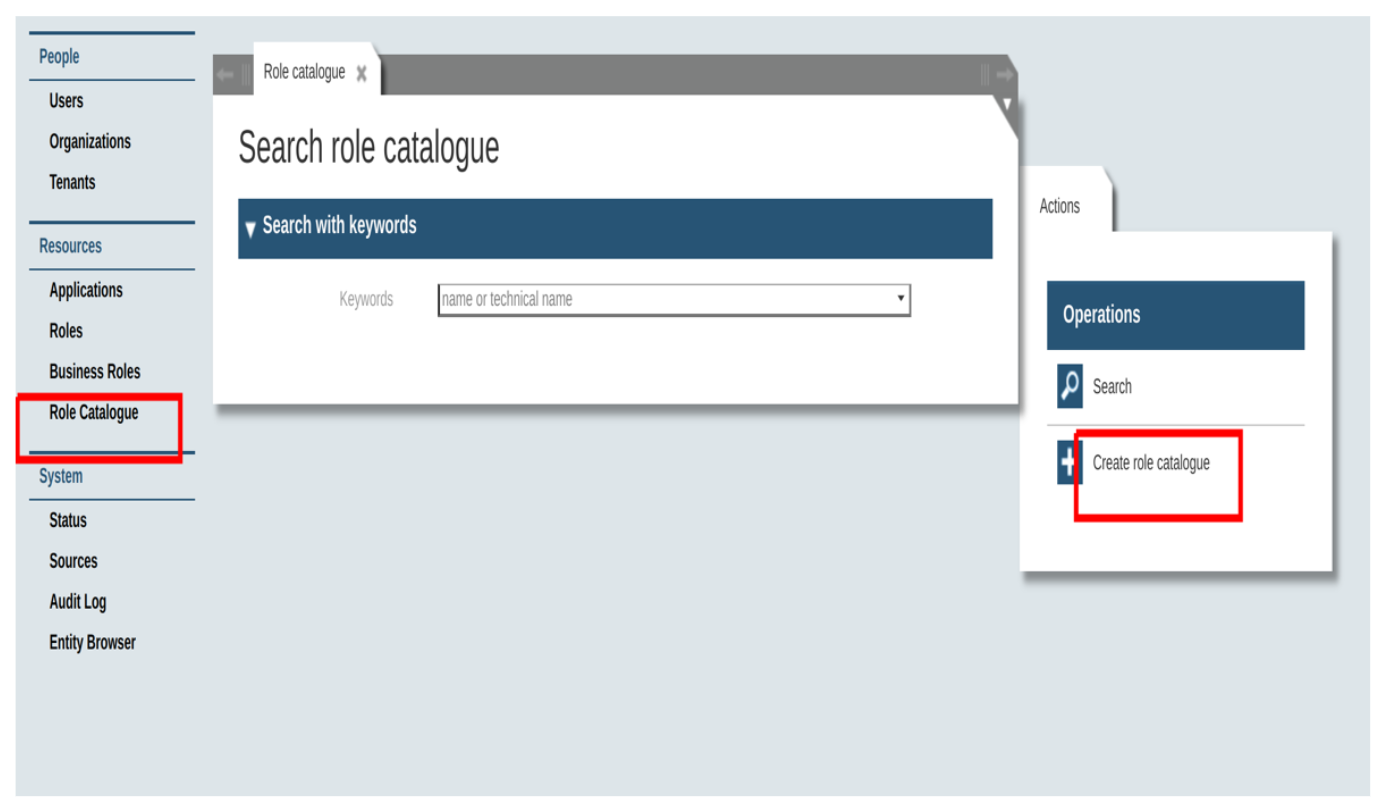
Role Catalogue
Role catalogue in general contains the set of application roles (not tag roles) and is associated with the organizational unit so that the persons associated with the organizational unit can get the roles assigned. It can be created in the admin tool like below,

Types of role catalogue
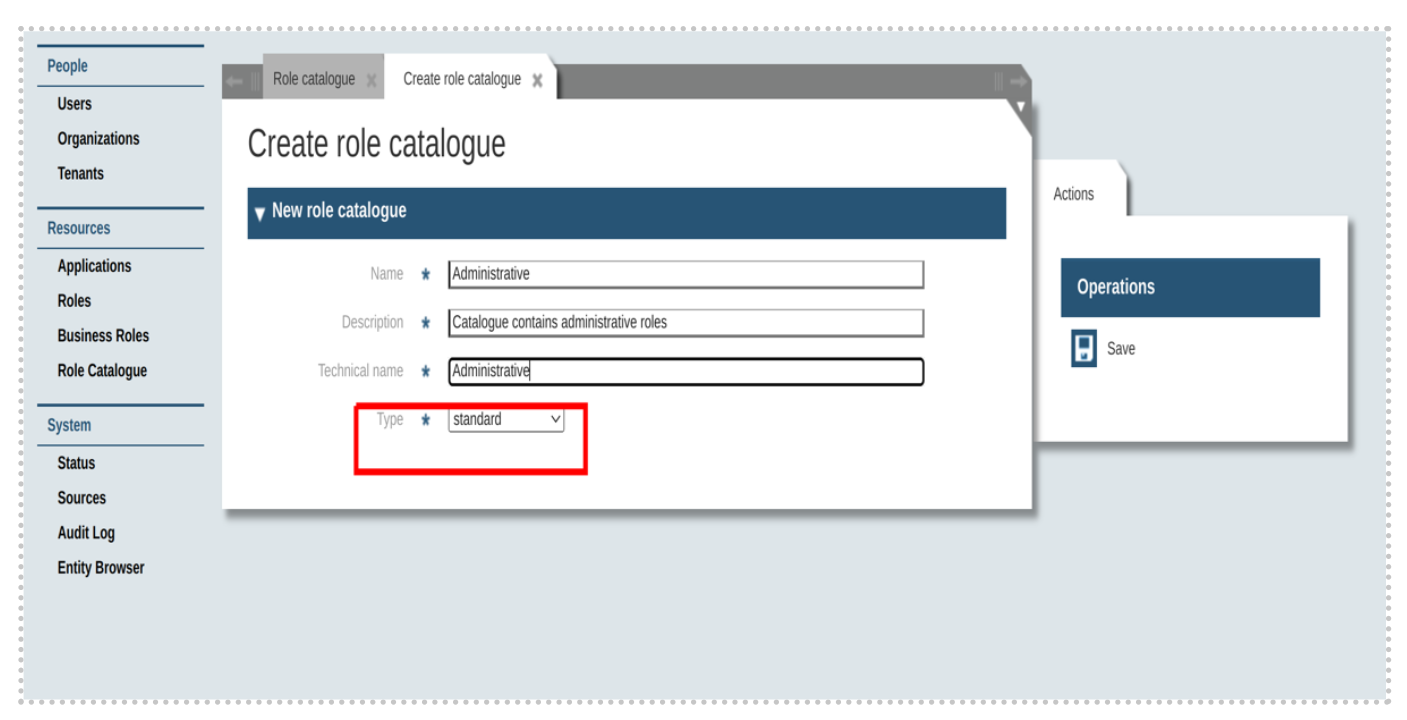
Role catalogue consists of two types -
-
Standard Role Catalogue: Standard catalogue which contains roles for the standard portfolios
-
CustomerSpecific Role Catalogue: Customer specific catalogue which contains roles for specific customer’s portfolios.
Standard role catalogue
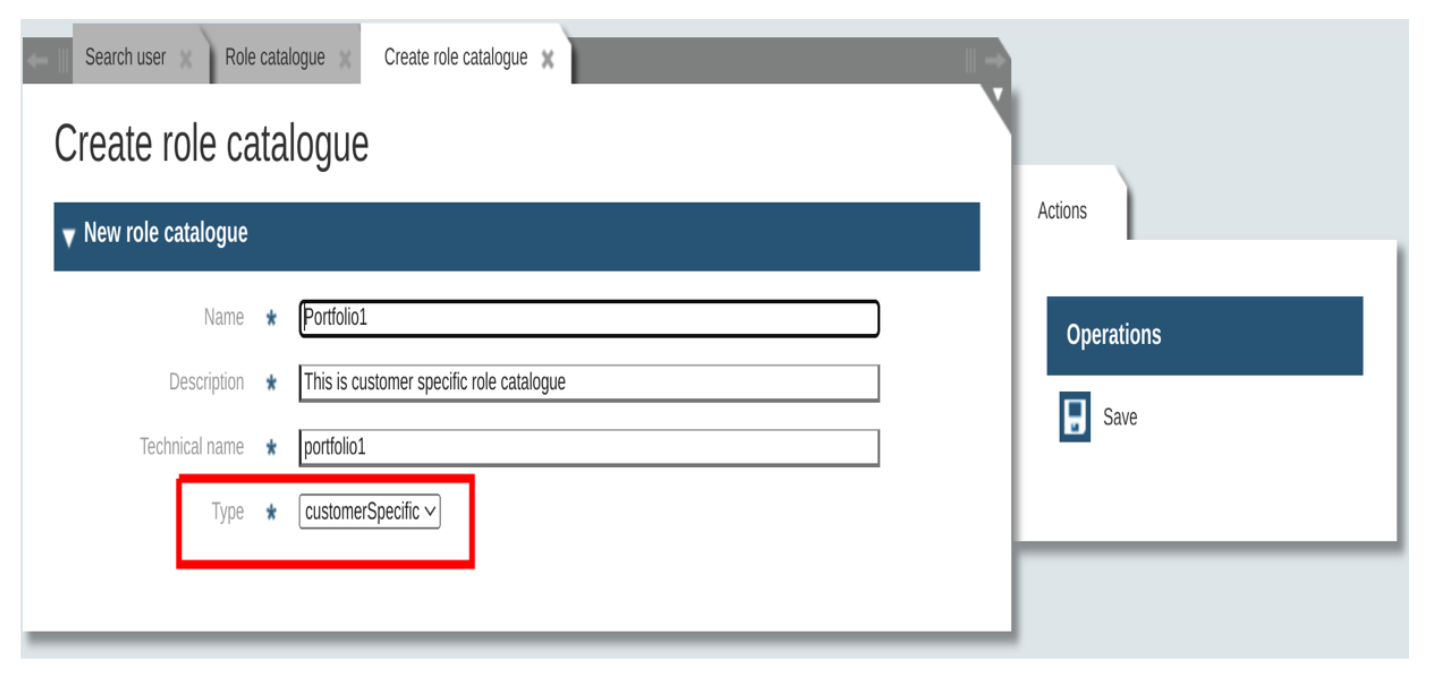
There can be only one standard role catalogue attached to the organizational unit. Standard role catalogue can hold roles to be assigned as standard roles for users associated with the organizational unit. Standard role catalogue can be created like below,
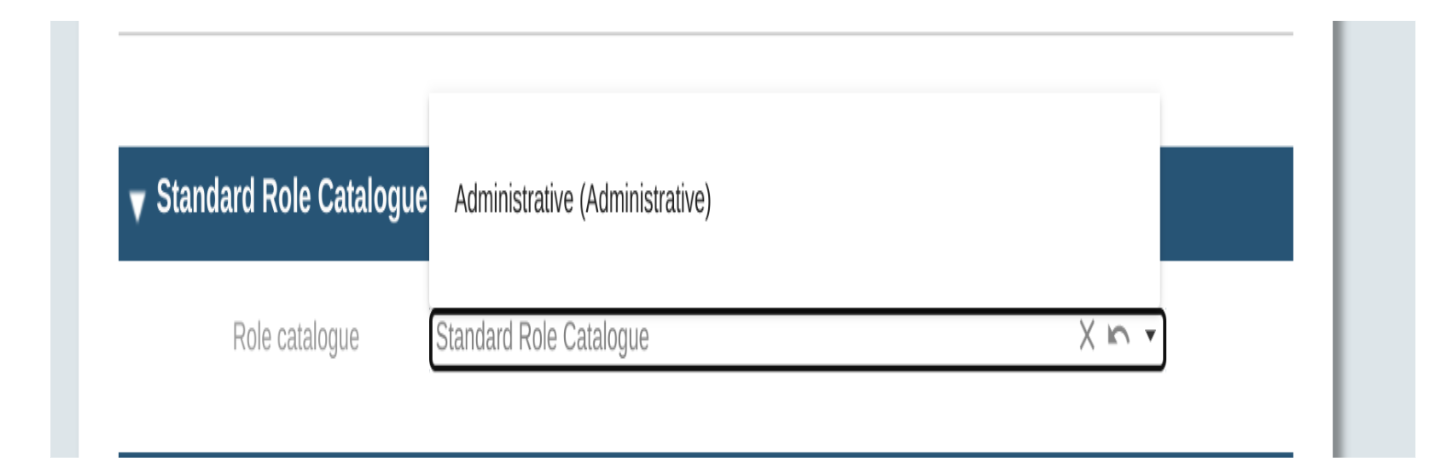
Organizational unit details page has the possibility to associate the standard role catalogue as like below,
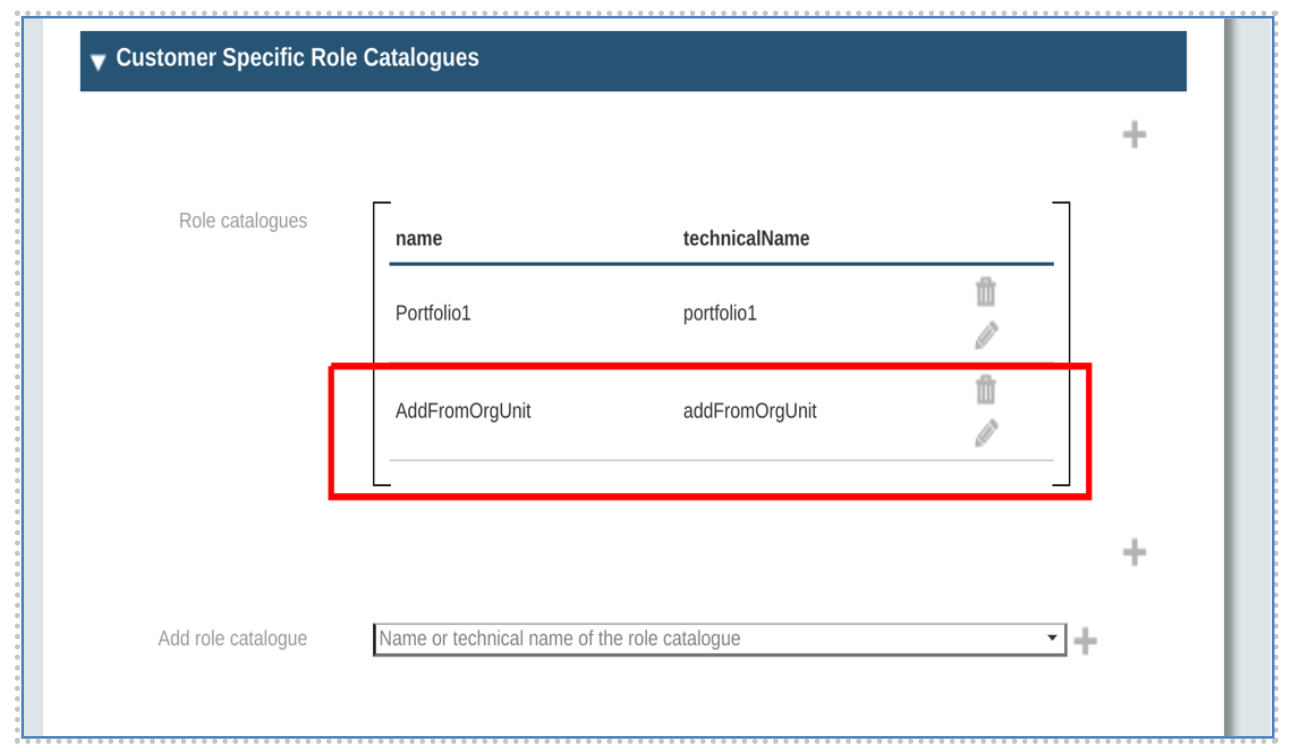
Customer specific role catalogue
There can be a set of customer specific role catalogues attached to the organizational unit. Customer specific role catalogues can hold roles to be assigned as portfolio roles for users associated with the organizational unit.
Customer specific rolecatalogues can be created like below,
Organizational unit details page has the possibility to associate the customer specific catalogues as like below,

Add customer specific catalogues to orgUnit
Customer specific role catalogues can be added to the organizational unit details page like below,
-
Go to customer specific catalogues section in organizational unit details page

-
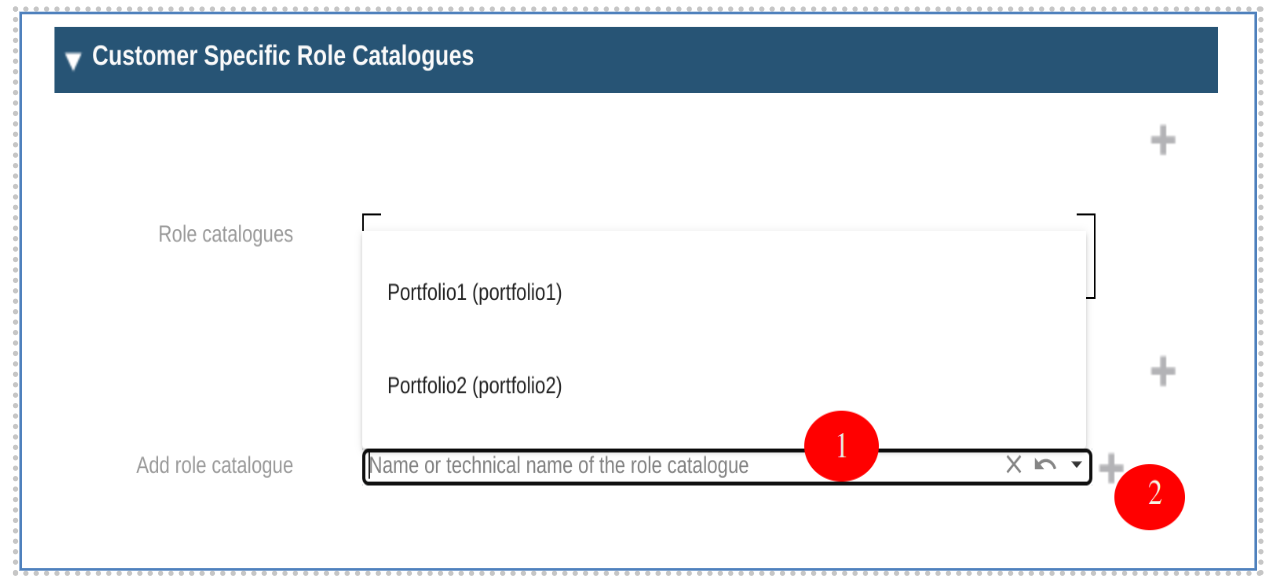
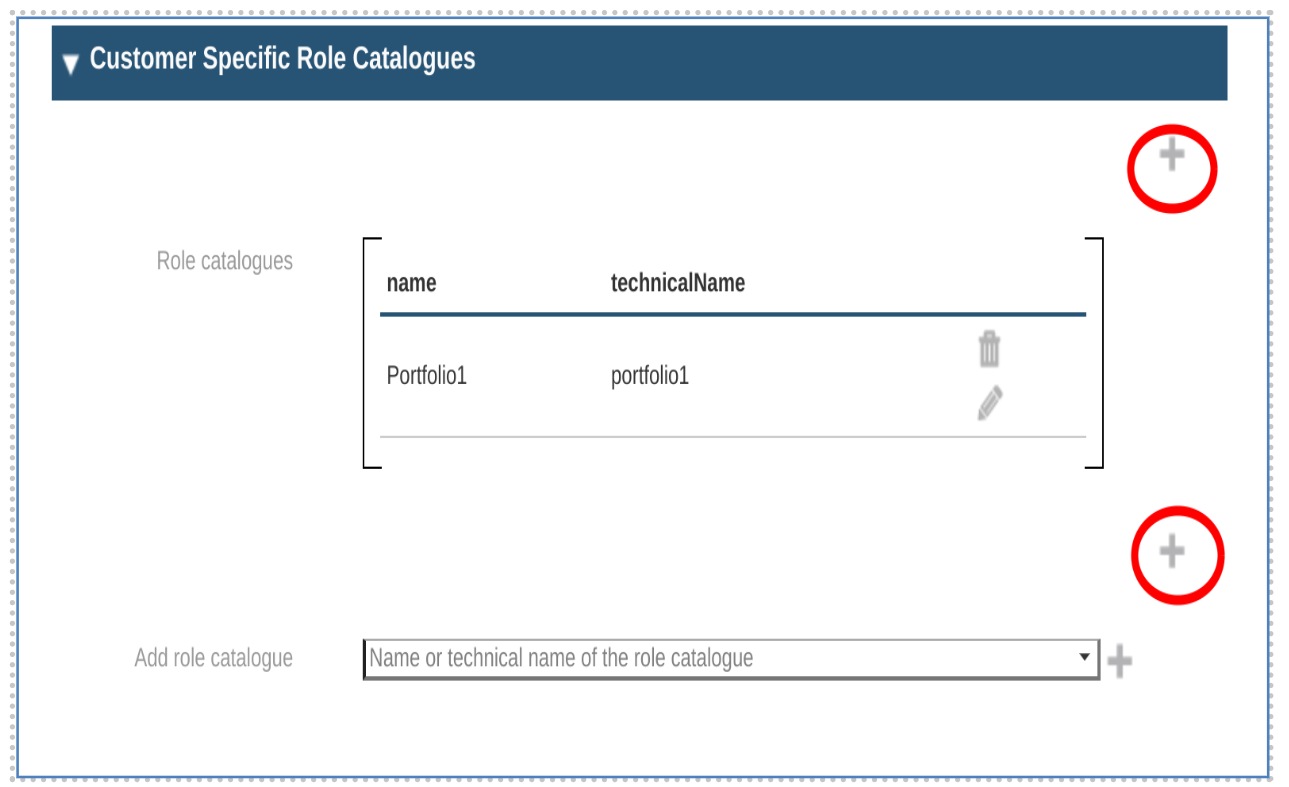
Click plus button beside the ‘Add role catalogue’ field below. After clicking the add role box, all the customer specific role catalogue will be displayed. Add role to the list by clicking the plus button and save.
-
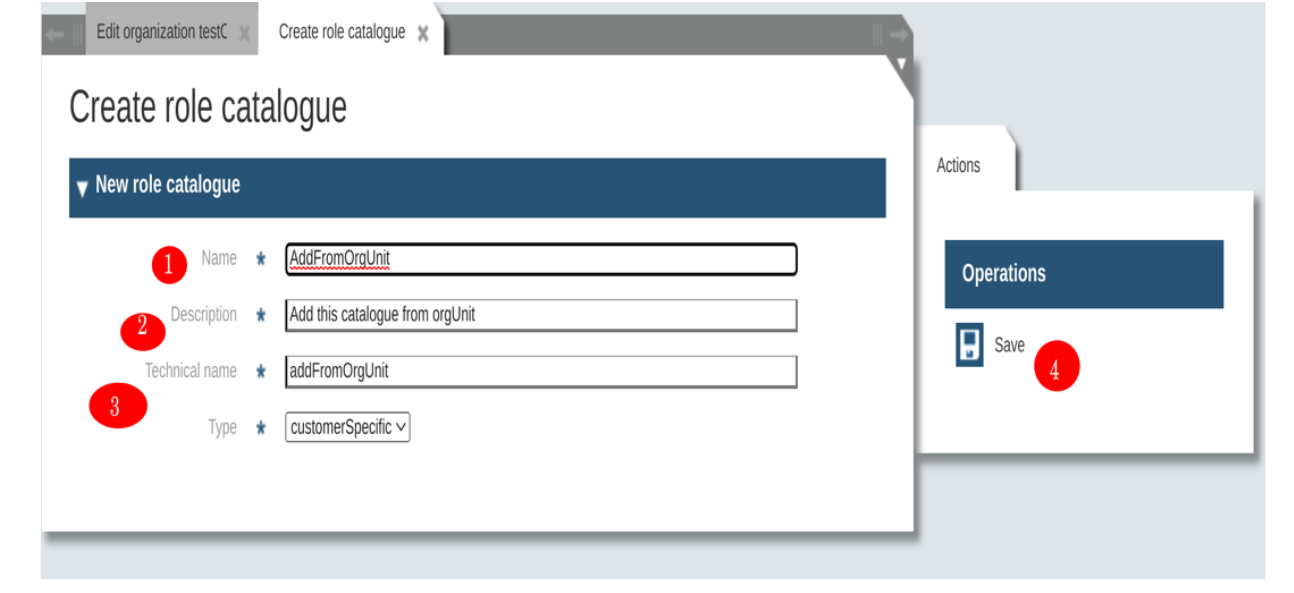
It is also possible to create a new customer specific role catalogue from orgUnit page. For this, click the plus buttons above or below the role catalogue list. After clicking the button, it will propagate to the create role catalogue page.
-
Add information about the catalogue and save
-
Go back to the organizational unit page and can see role catalogue is already added into the list
Delegated Administration
The Delegated administration is a powerful feature of the IMS that offers you the capability to group your users modeling their organizations or the given external user structure, like customers or members.
In the current example, we refer to a structure with a corporation at its top level, with one or more companies in the layer below. Every company is made of organizational units, where you can assign the users. Every layer has an administrator, able to manage the current layer and all the organizations below it. To manage the corporate level, you should own the “CORPORATE_USER_ADMIN” while to manage the company and the organizational unit you must possess the roles “COMPANY_USER_ADMIN” and “ORG_USER_ADMIN”, respectively.
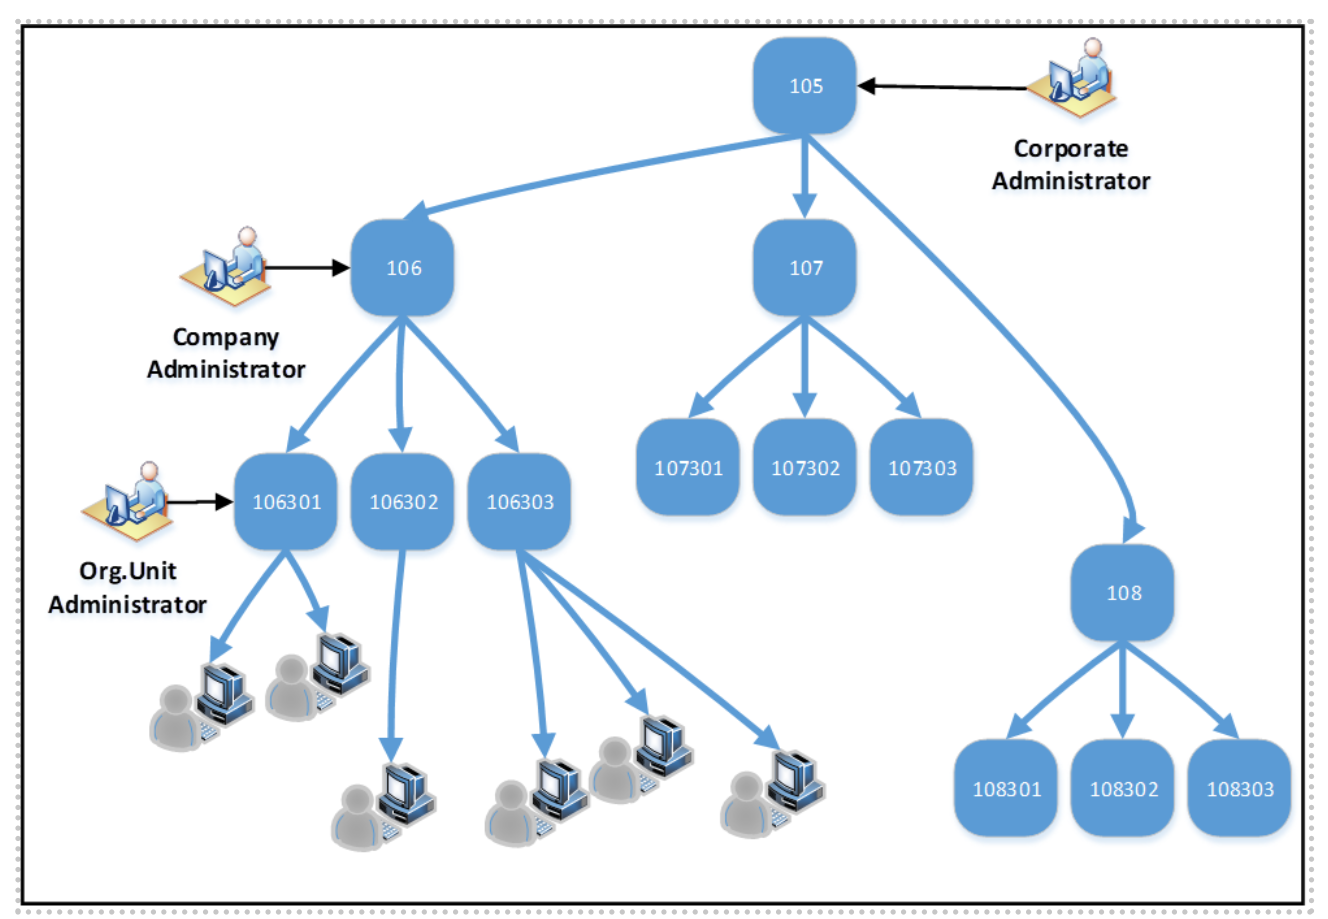
The data model of an organization and its components is very simple: an organizational unit, here the lowest organizational object, owns a few attributes like: ID, Name, Description, Type, Parent and Manager.
The "ID" of the organization identifies the object inside the system and once assigned should never be changed. In our example, the ID of the Organizational Units of the top two layers have a constraint and must have three digits, while the other units must have an ID containing 8 digits.
The attribute "Name" contains the display name of the organization and is a string allowing up to 64 UTF-8 Characters. The same can be said about the attribute "Description".
The attribute "Type" defines additionally the type of the organization: Layer-1, Layer-2 or something else. In the example, the layers are "corporation", "company", "organizational unit" but both the names and the depth of the tree are arbitrary and can be customized.
The attribute "Parent" points to the organization above the current. If it is empty, the organization is the top object. In that case, creation of the organization will be at a corporate level.
The last interesting attribute is the "Manager", containing a reference to the manager of the organization.
There is no relationship between the manager of an organization and an administrator: these are simple registered users who own the role “Administrator”.
The user can be associated to an organization and at any moment to an organizational unit: The corresponding administrator can pick up a user from the list of the "not-yet-associated" users and define the association. In the user object, the association is simply an attribute containing the ID of the associated organization.
Define a Corporate Administrator
After the creation, a user owns only the default security classes. A “default security class” in our example is (010) REGISTERED_USER and means that the user can perform a login. The user got this security class automatically during registration.
You may inquire about the current security class opening the user in the user maintenance in the IMS, under People, Users, search and then click on the corresponding user to check their security class.
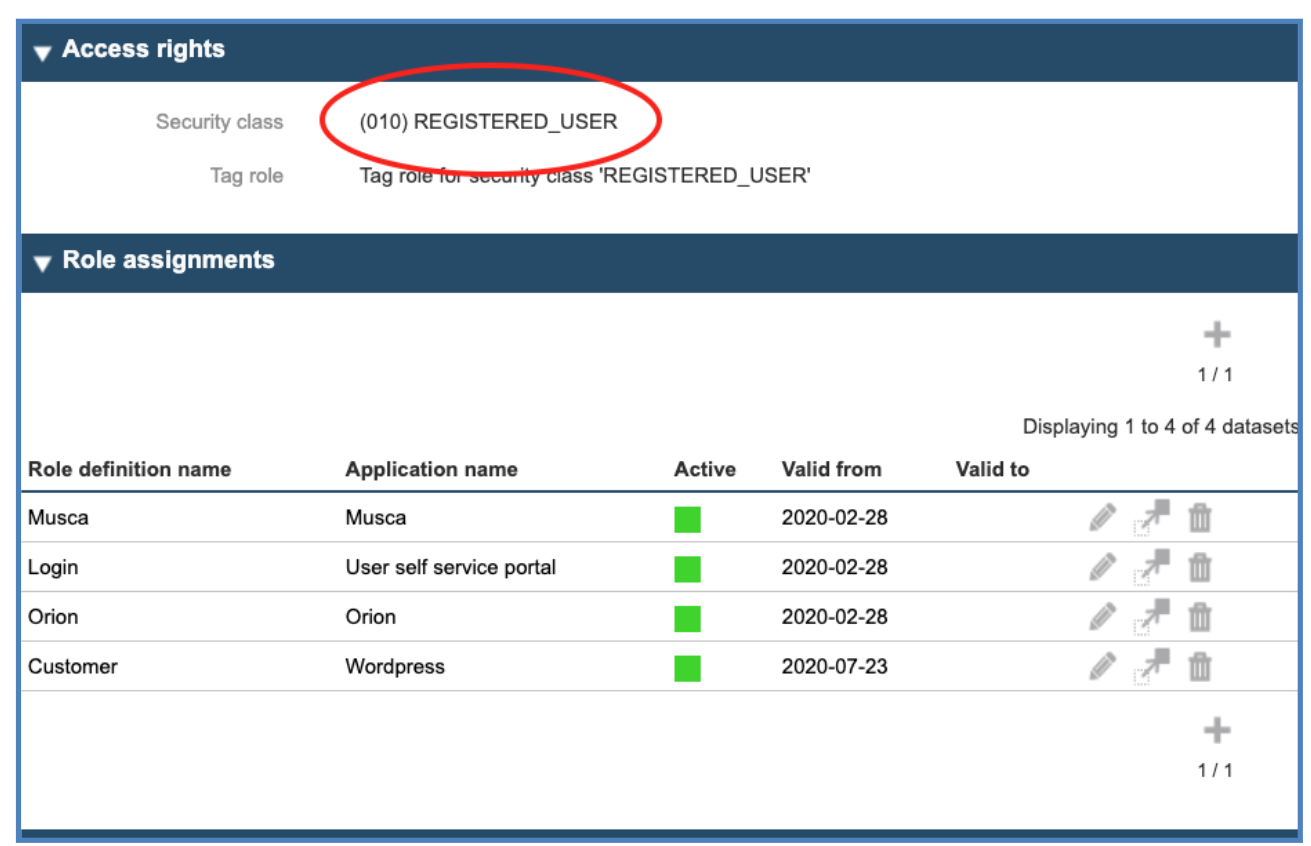
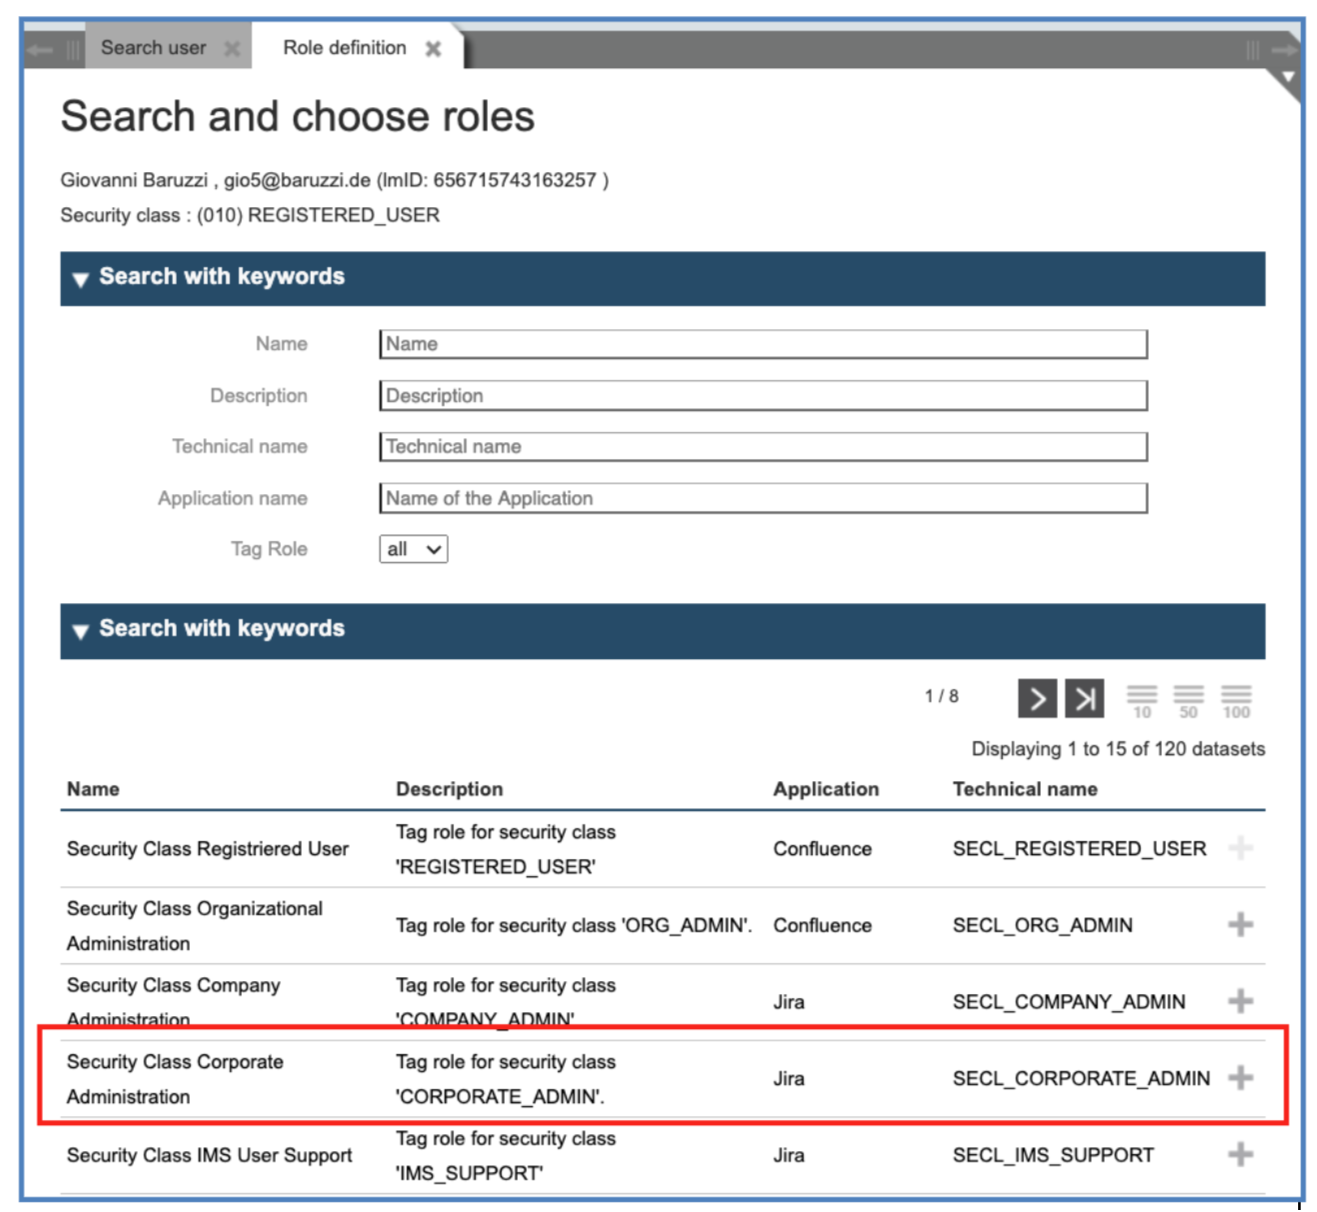
For example, to raise someone to “Corporate Administrator”, we need first to set their security class properly. This can be done through the assignment of a role called “Tag-Role”, a role which is being used to change the security class.
This approach allows a later introduction of workflows for this scope.
Now the user owns the security class “CORPORATE_ADMIN” (50) and the roles related to this class (and below) are now displayed in the list.
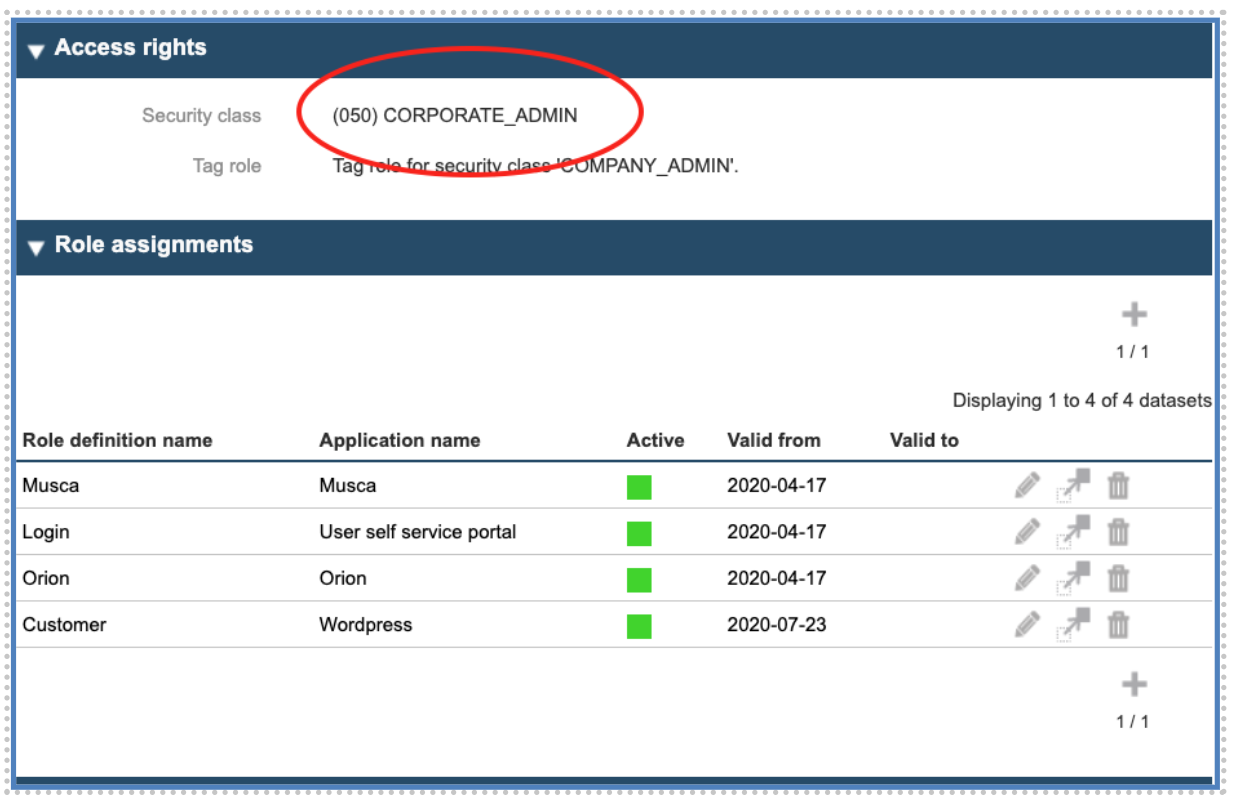
We may now assign to the user the role „Administrator "of the level „Corporation”.
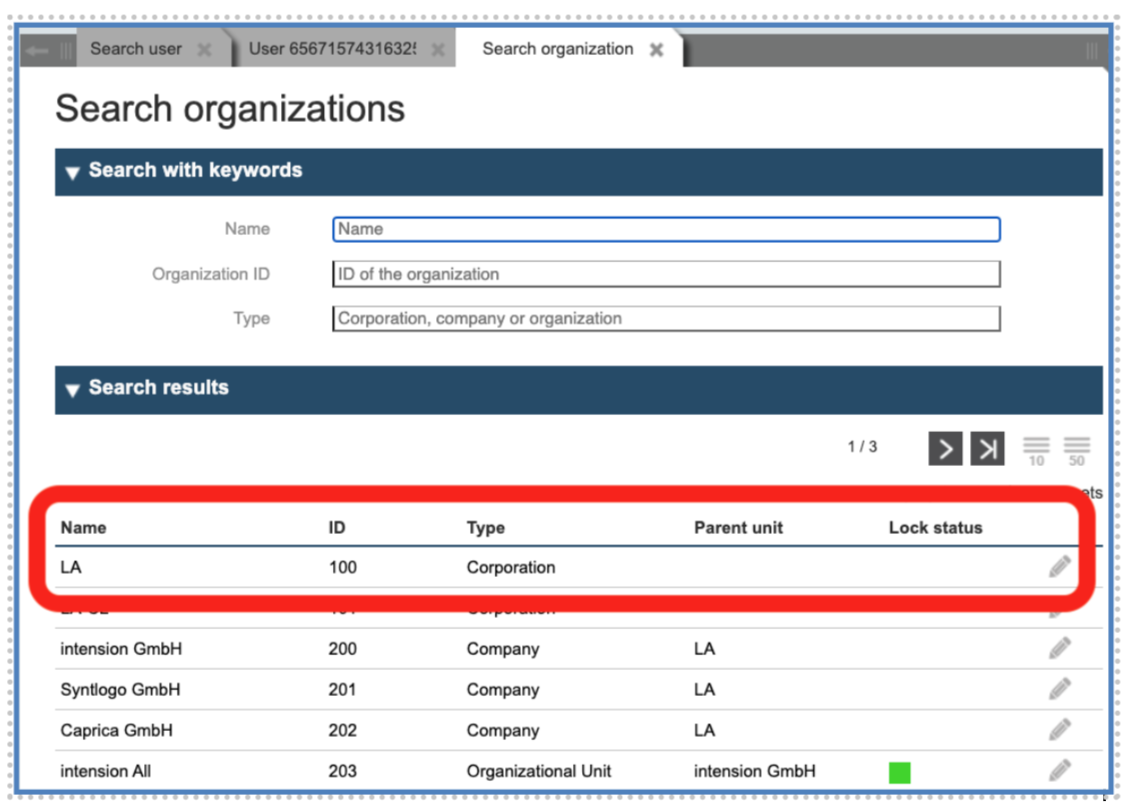
This is a parametrized role and accepts as parameter the ID of the corporation itself. (You may find the ID of the desired Corporation, Company or Organisational Unit searching their entry through the “Organisation” Menu on the left column.)
You can find the IDs of the corporation in the IMS tool under the link “Organizations” on the left panel.
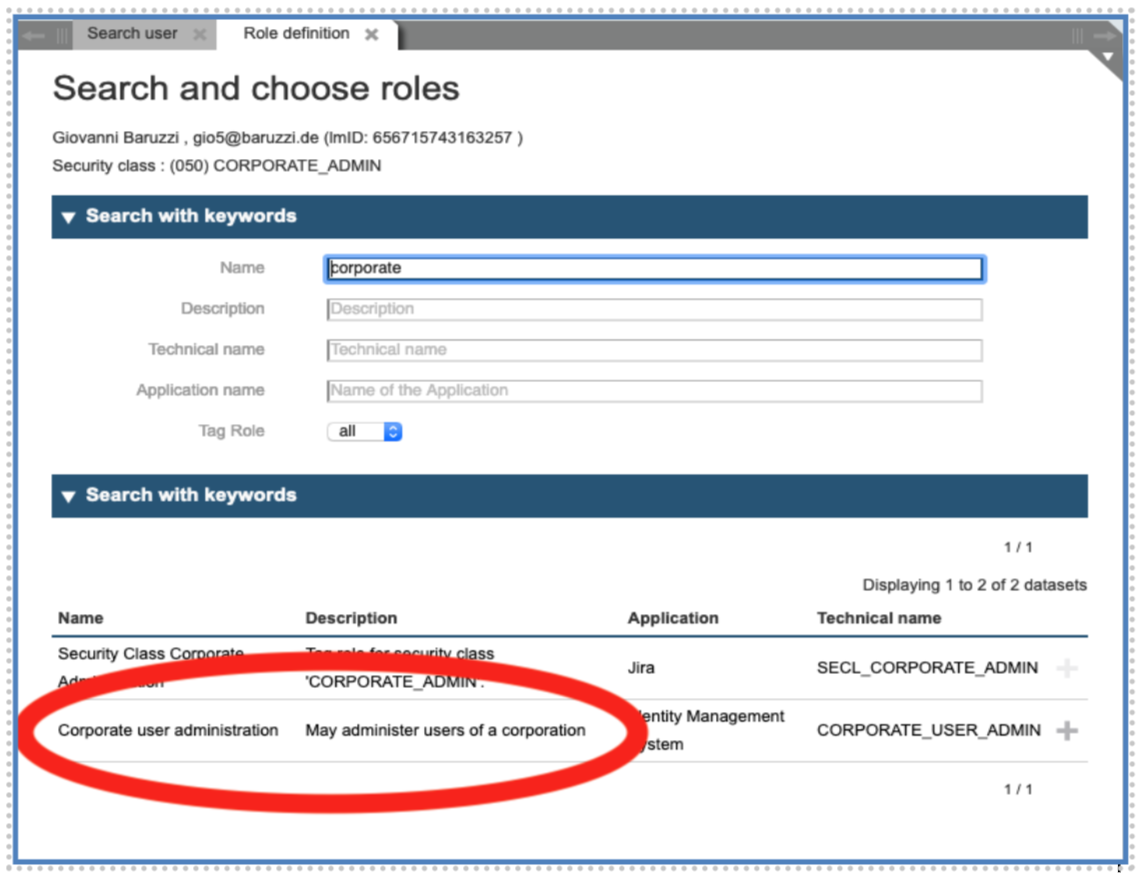
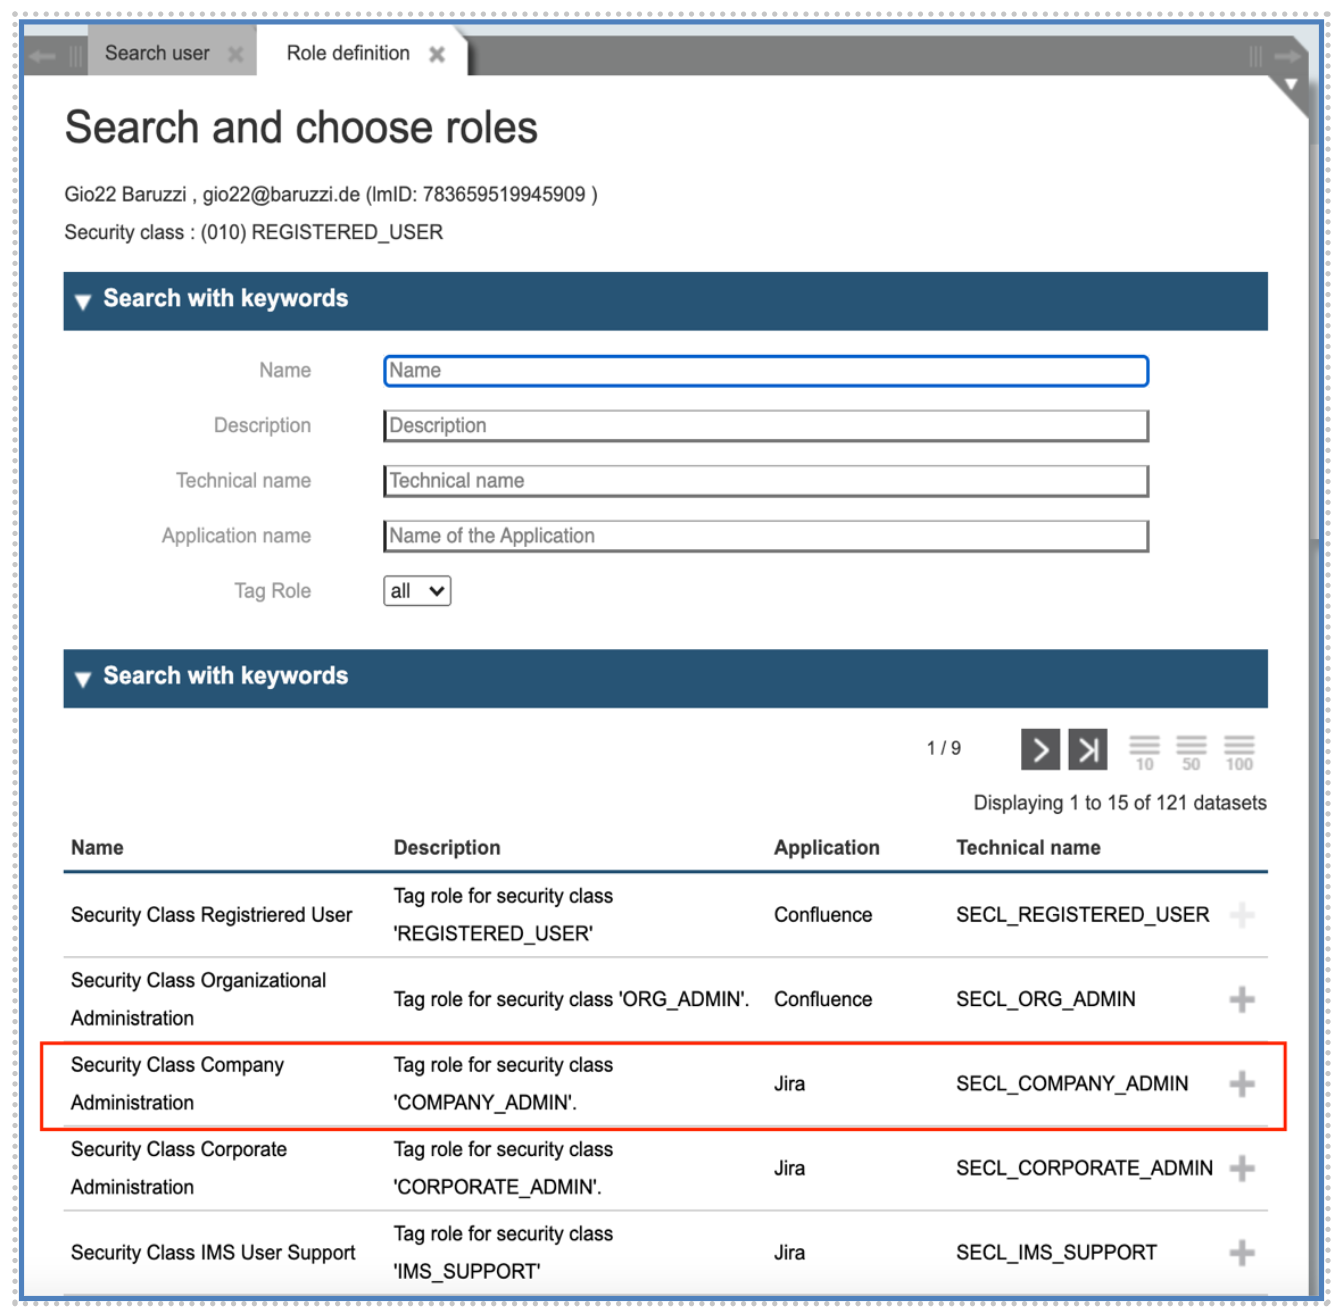
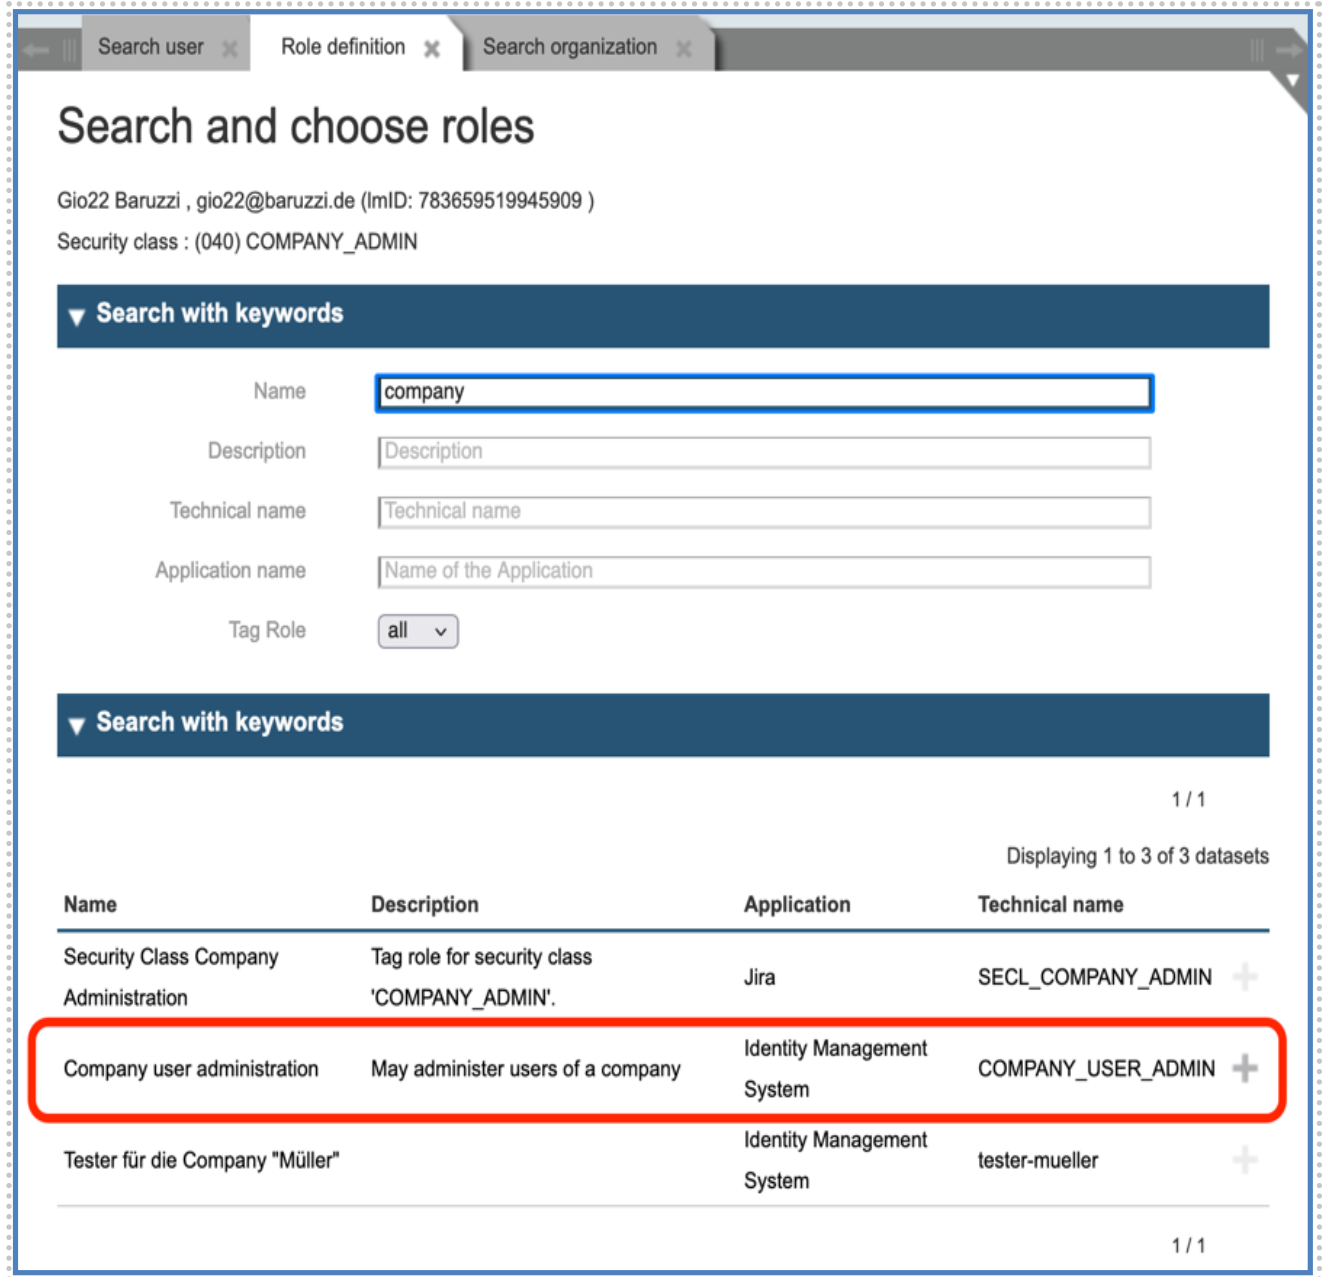
We can now assign the role “Corporate user administration”:
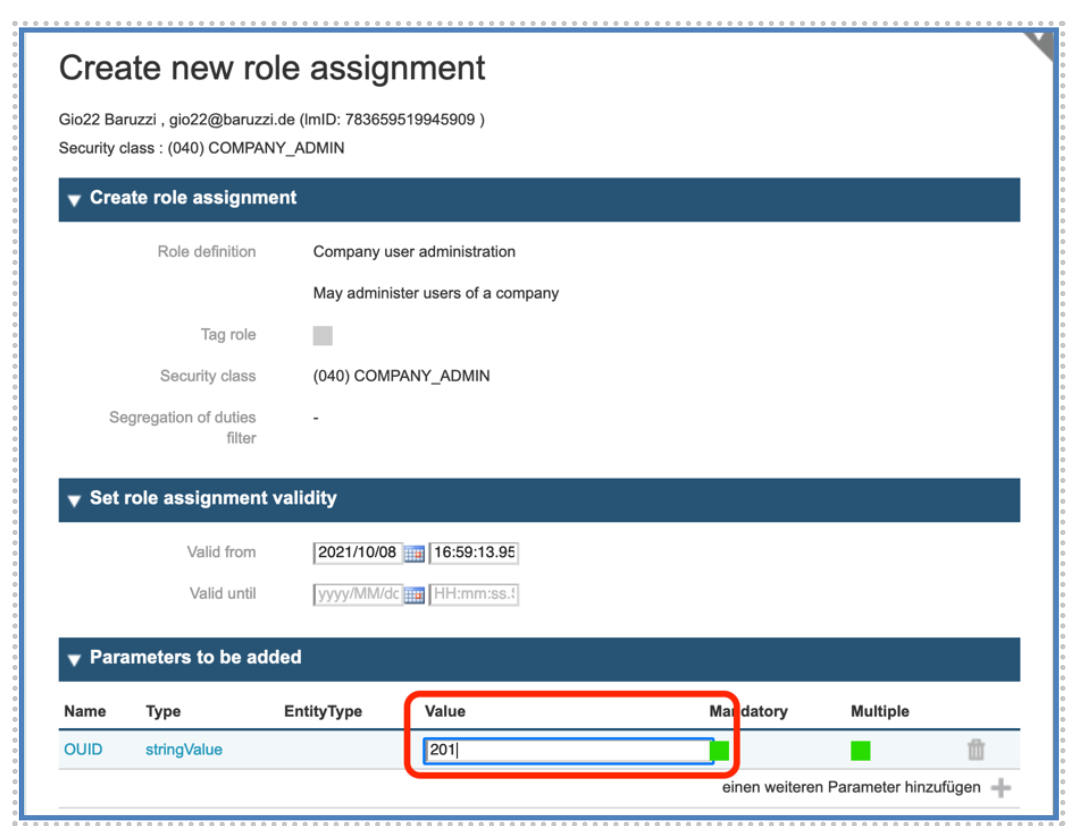
Please type in the parameter OUID the ID of the corporation to be managed (in our example “100", see figure 49).

After confirming the assignment and storing, the user will have the “Corporate Administrator Role” for the corporation specified.
You may want to add a few other roles that are particularly important for a corporate administrator, giving him access to most used functions:
“Application administration”: allows you to define new applications and manage existing ones. Take care: applications defined here are valid for the IMS. You may want to configure them separately for the SSO. An application in the SSO is defined as a “Client” inside a “Realm”. The Realm is normally associated to a “Tenant”.
“Role Administration”: allows you to manage the roles of an application.
“Entity Browser”: enables the usage of the corresponding tool.
“Create User with Password”: allows the creation of a user and the manual assignment of an initial password.
“Reset Password”: enables the capability to reset a password.
“Audit Reader”: gives access to Audit/History.
Define a Company Administrator
In a similar way as for the “Corporate Administrator”, to raise someone as “Company Administrator”, we need first to set his Security Class accordingly. This can be done through the assignment of a role called “Tag-Role”, a role which is being used to change the Security Class.
This approach allows a later introduction of workflows for this scope.
We now assign the „Administrator "role to the user for the level „Company”. Again, this is a parametrized role and accepts as parameter the ID of the Company itself:
Please type in the parameter OUID (“Organization Unit IDentifier”) the ID of the Company to manage it.
After confirming the assignment and storing the user, they will have “Company Administrator Role” for the Company specified.
You may want to add a few other roles that are very important for a Company Administrator, giving him access to the most used functions:
-
Application administration: allows you to define new applications and manage existing ones. Take care: the Application defined here are valid for the IMS. You may want to configure them separately for the SSO (“Tenants”).
-
Role Administration: allows you to manage the roles of an application.
-
Entity Browser: enables the usage of the corresponding tool.
-
Create User with Password: allows the creation of a user and the manual assignment of a start password.
-
Reset Password: enables the capability to reset a password.
-
Audit Reader: enables access to the Audit/History function.
Security Model of IMS Tool
The Identity Management System Tool (IMS-Tool) is the administrator and user interface to the complete administration of User Identities and access roles of the entire IMS. To operate this complex application the user must own appropriate roles after login.
To grant the user all accesses they need to accomplish their duty, the IMS-Tool uses a sophisticated Security Model based on the Syntlogo SecuRole® framework.
Security Classes
Before coming to the description of Application roles, we would like to understand the concept of “Security Classes”: every IMS-Role is associated to a Security Class. The Security Class is a number between 0 (minimum) and 100 (maximum) indicating the sensitivity of a role.
Next to the Roles, every user (administrators and “normal” users) is associated to a Security Class: The Rule is that an Administrator can grant a Role to a user only if his own Security Class is GREATER than the Security Class of the Role.
Section 1: Concept
Security classes are part of the IMS security concept. The Security Classes are assigned with increasing values proportional to the sensitivity of the role.
Every IMS application role and every user is always assigned to a Security Class which has three functions:
Visibility of a role: a user can see all the roles whose security class is the same or lower than their own.
Management of a role: A user can manage (create, modify, delete) all roles whose security class is lower or equal to the user’s security class.
Assignment of a role: It defines the lowest Security Class a user should have to assign this role to another user.
Section 2: Technical details
Every Role and User in IMS is associated to a Security Class. The Security Class is described by an integer level between 0 (minimum) and 100 (maximum) indicating the sensitivity of a role.
An Administrator can grant a Role to a user only if two requirements are matching:
The administrators Security Class is GREATER than or EQUAL to the Security Class of the user.
The administrators Security Class is GREATER than the Security Class of the role which is being assigned.
Section 3: Changing the Security Class of a user
A Security Class is granted to a user through the association of a set of special "Tag Roles". Each Tag Role is associated with a Security Class.
What is ‘Tag role’: In IMS ‘Tag roles’ are roles that are used for the assignment of security class. Currently, IMS supports 6 tag roles, those are predominantly used for security class.
The defined Tag Roles, which are currently available, are listed in the table below.
| Security Class | Tag Role Name | Description |
|---|---|---|
10 |
REGISTERED_USER |
Refers to the status of a registered user. After confirmation of the registration by e-mail (double opt-in), the user can login into the MyProfile application. And then the user may autonomously book non-sensitive, simple and cost-free services, like a newsletter subscription. |
30 |
ORG_ADMIN |
The Administrator for the users belonging to an “Organizational Unit” (in the default hierarchy, this is currently the lowest level). |
40 |
COMPANY_ADMIN |
The Administrator for the users belonging to a “Company” (in the default hierarchy, this is currently the medium level). |
50 |
CORPORATE_ADMIN |
The Administrator of a “Corporation” (in the default hierarchy, this is currently the highest level). |
70 |
IMS_SUPPORT |
Tag Role for a member of the support. |
80 |
IMS_ADMIN |
Tag Role for the highest security class. |
When administrators change the assignment of a tag role, the Security Class thus granted is automatically changed accordingly. Thereby the latest assignment will always have priority and thus determines the most sensitive rights a user has after this change. Even if the tag role assigned earlier refers to a higher security class. (And vice versa the user will lose his higher rights through withdrawing them a role with a high security level, like IMS_ADMIN (Security Class 80))
For example: If a person is assigned to the tag role named "SECL_COMPANY_ADMIN", his Security Class is updated to "COMPANY_ADMIN" level.
Section 4: Effect of Security Classes on role assignment
The below picture shows the hierarchy of the security class based on their associate tag roles assignment.
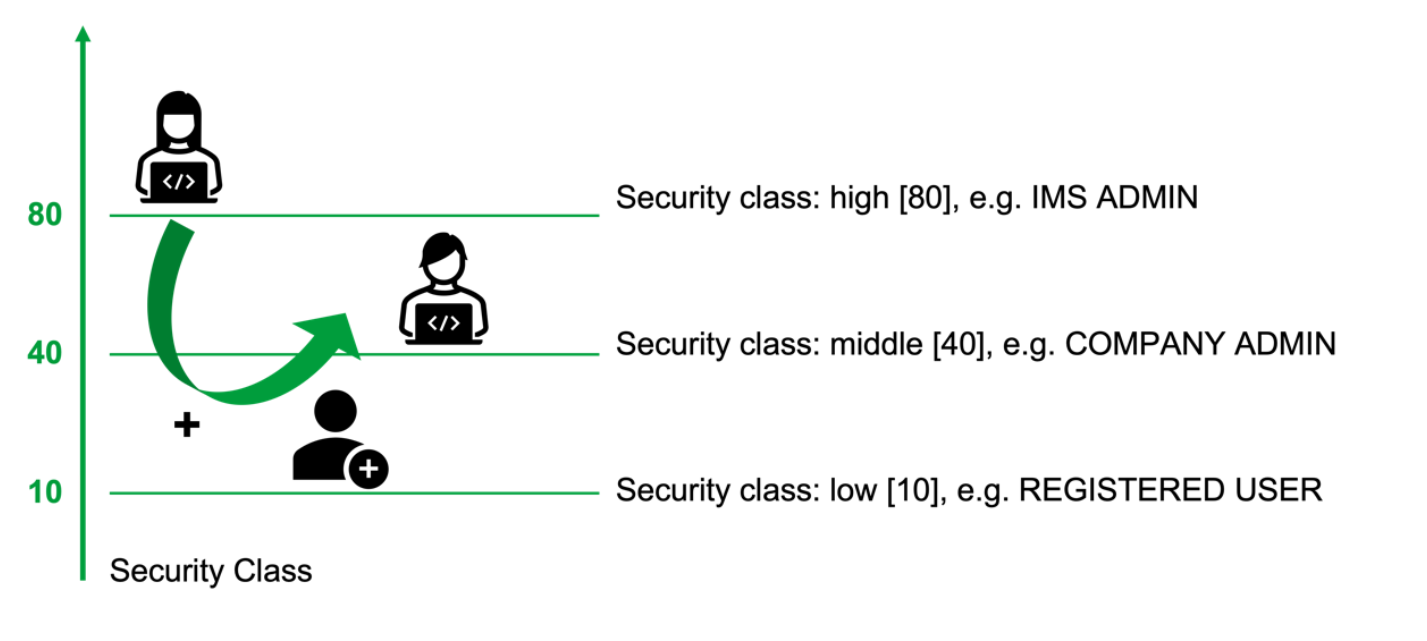
As described earlier, a role is associated with a Security Class. The Security Class determines the visibility of the role for assignment and editing for an administrator to manage users.
For example, a person with Security Class 30 aka ORG_ADMIN can be assigned roles with this Security Class or lower.
In the special case of tag roles, the security class controls which roles the user can assign to other people. For example, an administrator with Security Class 50 aka CORPORATE_ADMIN, may assign all tag roles that have a lower Security Class than his own, i.e., from 10 to excluding 50.
Section 5: Roles of the IMS Application
The following table illustrates the application roles offered by the IMS-Tool:
| Role Name | Param | Security Class | Description |
|---|---|---|---|
CORPORATE_USER_ADMIN |
OUID |
50 |
Administrator can manage users of a corporation |
COMPANY_USER_ADMIN |
OUID |
40 |
Administrator can manage users of a company |
ORG_USER_ADMIN |
OUID |
30 |
Administrator can manage users of an organizational unit |
ROLE_ADMIN |
80 |
Display and use of role administration, configuration of roles |
|
APPLICATION_ADMIN |
80 |
Display and use of application administration, configuration of applications |
|
SUPERADMIN |
80 |
Allows for unrestricted use of admin tools |
|
ENTITYBROWSER |
80 |
Allows unrestricted use of Entity Browser (EyBrow) |
|
CREATEUSERWITHPASSWORD |
80 |
Authorized to create user with a (default) password |
|
IMS_USER_ADMIN |
70 |
Administrator can manage all IMS users |
|
MYPROFIL_USER |
10 |
Enabled access to the user self-service application MyProfile |
|
RESETPASSWORD |
70 |
Authorized to reset a user’s password |
|
CLIENT_ADMIN |
Client |
80 |
Administrator of OIDC Client |
AUDIT_READER |
80 |
Enabled access to the History |
Glossary
| Term | Definition |
|---|---|
Metadirectory |
A metadirectory system provides for the flow of data between one or more directory services and databases, in order to maintain synchronization of that data, and is an important part of identity management systems. The data being synchronized typically are collections of entries that contain user profiles and possibly authentication or policy information. Most metadirectory deployments synchronize data into at least one LDAP-based directory server, to ensure that LDAP-based applications such as single sign-on and portal servers have access to recent data, even if the data is mastered in a non-LDAP data source. |
MFA |
Multiple Factor Authentication: an authentication workflow where multiple sources of information are being used to authenticate a user. For example, a dialog with a password and a confirmation over an authenticator from a registered smartphone. |
SSO |
Single sign-on (SSO) is a property of access control of multiple related, yet independent, software systems. With this property, a user logs in with a single ID and password to gain access to a connected system or systems without using different usernames or passwords, or in some configurations seamlessly sign on at each system. |
ABAC |
Attribute-based access control (ABAC) defines an access control paradigm whereby access rights are granted to users through the use of policies which combine attributes together. The policies can use any type of attributes (user attributes, resource attributes, objects, environment attributes etc.). This model supports Boolean logic, in which rules contain "IF, THEN" statements about who is making the request, the resource, and the action. For example: IF the requestor is a manager, THEN allow read/write access to sensitive data. |
RBAC |
Role-based-access-control (RBAC) is a policy neutral access control mechanism defined around roles and privileges. The access rights are not assigned to individual users, but rather based on defined roles. For example, each user is then assigned one or more roles depending on their position in the company. And based on this role assignment, the user receives the corresponding access rights to data and applications. |
GDPR |
The General Data Protection Regulation (GDPR) (Regulation (EU) 2016/679) is a regulation by which the European Parliament, the Council of the European Union and the European Commission intend to strengthen and unify data protection for all individuals within the European Union (EU). It also addresses the export of personal data outside the EU. The GDPR aims primarily to give control back to citizens and residents over their personal data and to simplify the regulatory environment for international business by unifying the regulation within the EU. When the GDPR takes effect, it will replace the data protection directive (officially Directive 95/46/EC) of 1995. The regulation was adopted on 27 April 2016. It becomes enforceable from 25 May 2018 after a two-year transition period and, unlike a directive, it does not require national governments to pass any enabling legislation, and is thus directly binding and applicable. |
Security Class |
Inside the Login-Master IMS and in the SecuRole Framework, as Security Class is mechanism to group Roles in different layers of criticality. The Security Class is assigned both to Users and Roles and the IMS guarantees that no user owns a Role whose Security Class is equal or higher of the Security Class of the user itself. The Security Class is represented in the User Registry as a number between 0 and 100 and the values are associated to the “Tag-Roles”. Tag Roles and values can be modified at project development level. |
Security Policy |
The security Policy of an Application are the mechanisms used by an application to guarantee that some action is performed only by users having certain roles. |